
UNICODE
Conversion
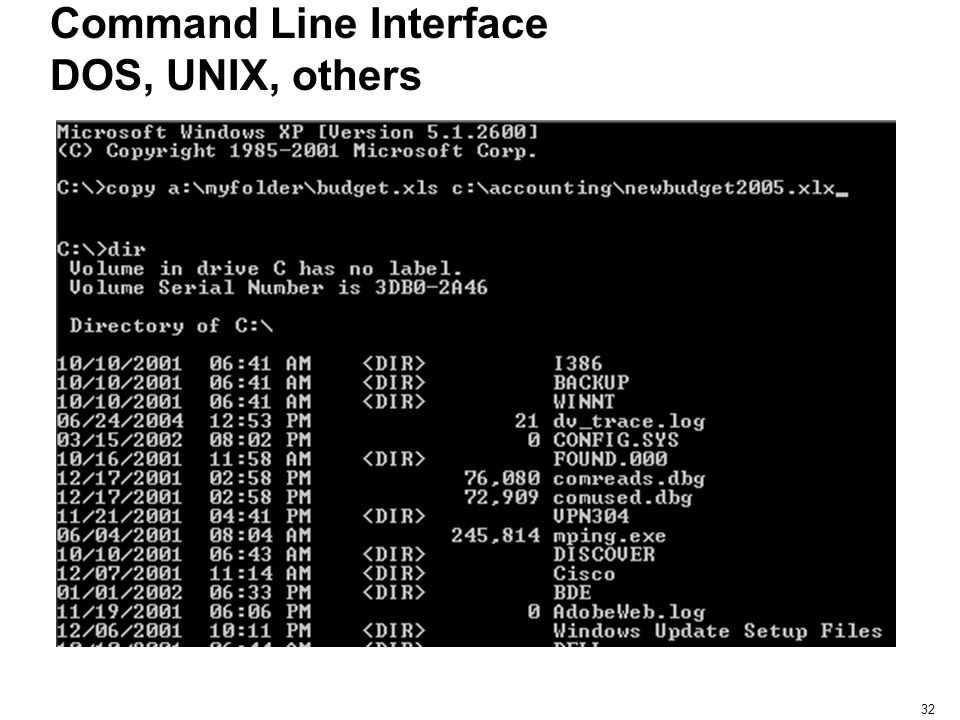
DOS,
All versions of dos2unix and unix2dos can convert UTF-8 encoded files, because
UTF-8 was designed for backward compatibility with ASCII.
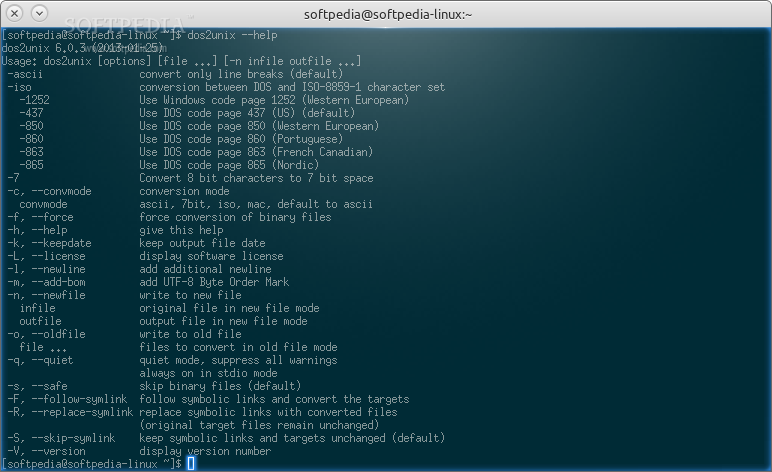
Dos2unix and unix2dos with Unicode UTF-16 support, can read little and big
endian UTF-16 encoded text files. To see if dos2unix was built with UTF-16
support type "dos2unix -V".
On Unix/Linux UTF-16 encoded files are converted to the locale character
encoding. Use the locale(1) command to find out what the locale character
encoding is. When conversion is not possible a conversion error will occur and
the file will be skipped.
On Windows UTF-16 files are by default converted to UTF-8. UTF-8 formatted
text files are well supported on both Windows and Unix/Linux.
UTF-16 and UTF-8 encoding are fully compatible, there will no text be lost in
the conversion. When an UTF-16 to UTF-8 conversion error occurs, for instance
when the UTF-16 input file contains an error, the file will be skipped.
When option "-u" is used, the output file will be written in the same UTF-16
encoding as the input file. Option "-u" prevents conversion to UTF-8.
Dos2unix and unix2dos have no option to convert UTF-8 files to UTF-16.
ISO and 7-bit mode conversion do not work on UTF-16 files.
Byte Order Mark
BOM
On Unix Unicode files typically don’t have a BOM. It is assumed that text files
are encoded in the locale character encoding.
Dos2unix can only detect if a file is in UTF-16 format if the file has a BOM.
When an UTF-16 file doesn’t have a BOM, dos2unix will see the file as a binary
file.
Use option "-ul" or "-ub" to convert an UTF-16 file without BOM.
Dos2unix writes by default no BOM in the output file. With option "-b"
Dos2unix writes a BOM when the input file has a BOM.
Unix2dos writes by default a BOM in the output file when the input file has a
BOM. Use option "-r" to remove the BOM.
Dos2unix and unix2dos write always a BOM when option "-m" is used.
Unicode file names on Windows
ANSI"dos2unix -V"
There are some issues with displaying Unicode file names in a Windows console.
See option "-D", "--display-enc". The file names may be displayed wrongly in
the console, but the files will be written with the correct name.
Unicode examples
UTF-16BOMUTF-8:
dos2unix -n in.txt out.txt
Convert from Windows UTF-16LE (without BOM) to Unix UTF-8:
dos2unix -ul -n in.txt out.txt
Convert from Unix UTF-8 to Windows UTF-8 with BOM:
unix2dos -m -n in.txt out.txt
Convert from Unix UTF-8 to Windows UTF-16:
unix2dos < in.txt | iconv -f UTF-8 -t UTF-16 > out.txt
Byte Order Mark
On Windows Unicode text files typically have a Byte Order Mark (BOM), because many Windows programs (including Notepad) add BOMs by default. See also http://en.wikipedia.org/wiki/Byte_order_mark.
On Unix Unicode files typically don’t have a BOM. It is assumed that text files are encoded in the locale character encoding.
Dos2unix can only detect if a file is in UTF-16 format if the file has a BOM. When an UTF-16 file doesn’t have a BOM, dos2unix will see the file as a binary file.
Use option or to convert an UTF-16 file without BOM.
Dos2unix writes by default no BOM in the output file. With option Dos2unix writes a BOM when the input file has a BOM.
Unix2dos writes by default a BOM in the output file when the input file has a BOM. Use option to remove the BOM.
Dos2unix and unix2dos write always a BOM when option is used.
GB18030
GB18030GB18030
GB18030 is fully compatible with Unicode, and can be considered an unicode
transformation format. Like UTF-8, GB18030 is compatible with ASCII. GB18030
is also compatible with Windows code page 936, also known as GBK.
On Unix/Linux UTF-16 files are converted to GB18030 when the locale encoding is
set to GB18030. Note that this will only work if the locale is supported by the
system. Use command "locale -a" to get the list of supported locales.
On Windows you need to use option "-gb" to convert UTF-16 files to GB18030.
GB18030 encoded files can have a Byte Order Mark, like Unicode files.
EXAMPLES
    dos2unix < a.txt
    cat a.txt | dos2unix
Convert and replace a.txt. Convert and replace b.txt:
    dos2unix a.txt b.txt
    dos2unix -o a.txt b.txt
Convert and replace a.txt in ascii conversion mode:
dos2unix a.txt
Convert and replace a.txt in ascii conversion mode,
convert and replace b.txt in 7bit conversion mode:
    dos2unix a.txt -c 7bit b.txt
    dos2unix -c ascii a.txt -c 7bit b.txt
    dos2unix -ascii a.txt -7 b.txt
Convert a.txt from Mac to Unix format:
    dos2unix -c mac a.txt
    mac2unix a.txt
Convert a.txt from Unix to Mac format:
    unix2dos -c mac a.txt
    unix2mac a.txt
Convert and replace a.txt while keeping original date stamp:
    dos2unix -k a.txt
    dos2unix -k -o a.txt
Convert a.txt and write to e.txt:

dos2unix -n a.txt e.txt
Convert a.txt and write to e.txt, keep date stamp of e.txt same as a.txt:
dos2unix -k -n a.txt e.txt
Convert and replace a.txt, convert b.txt and write to e.txt:
    dos2unix a.txt -n b.txt e.txt
    dos2unix -o a.txt -n b.txt e.txt
Convert c.txt and write to e.txt, convert and replace a.txt,
convert and replace b.txt, convert d.txt and write to f.txt:
dos2unix -n c.txt e.txt -o a.txt b.txt -n d.txt f.txt
CONVERSION MODES
- ascii
-
In mode "ascii" only line breaks are converted. This is the default conversion
mode.Although the name of this mode is ASCII, which is a 7 bit standard, the
actual mode is 8 bit. Use always this mode when converting Unicode UTF-8
files. - 7bit
-
In this mode all 8 bit non-ASCII characters (with values from 128 to 255)
are converted to a 7 bit space. - iso
-
Characters are converted between a DOS character set (code page) and ISO
character set ISO-8859-1 (Latin-1) on Unix. DOS characters without ISO-8859-1
equivalent, for which conversion is not possible, are converted to a dot. The
same counts for ISO-8859-1 characters without DOS counterpart.When only option "-iso" is used dos2unix will try to determine the active code
page. When this is not possible dos2unix will use default code page CP437,
which is mainly used in the USA. To force a specific code page use options
"-437" (US), "-850" (Western European), "-860" (Portuguese), "-863" (French
Canadian), or "-865" (Nordic). Windows code page CP1252 (Western European) is
also supported with option "-1252". For other code pages use dos2unix in
combination with iconv(1). Iconv can convert between a long list of character
encodings.Never use ISO conversion on Unicode text files. It will corrupt UTF-8 encoded files.
Some examples:
Convert from DOS default code page to Unix Latin-1:
dos2unix -iso -n in.txt out.txtConvert from DOS CP850 to Unix Latin-1:
dos2unix -850 -n in.txt out.txtConvert from Windows CP1252 to Unix Latin-1:
dos2unix -1252 -n in.txt out.txtConvert from Windows CP1252 to Unix UTF-8 (Unicode):
iconv -f CP1252 -t UTF-8 in.txt | dos2unix > out.txtConvert from Unix Latin-1 to DOS default code page:
unix2dos -iso -n in.txt out.txtConvert from Unix Latin-1 to DOS CP850:
unix2dos -850 -n in.txt out.txtConvert from Unix Latin-1 to Windows CP1252:
unix2dos -1252 -n in.txt out.txtConvert from Unix UTF-8 (Unicode) to Windows CP1252:
unix2dos < in.txt | iconv -f UTF-8 -t CP1252 > out.txt
dos2unix / unix2dos
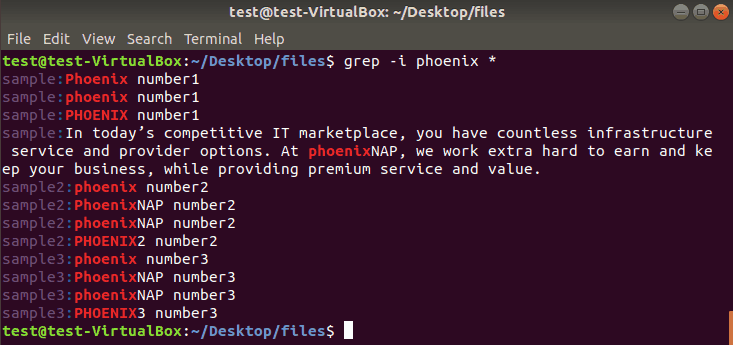
So a common problem is finding a file in one format, when you need it to be in the other format. Many utilities can cope with both formats (Notepad++, VIM, spring to mind) but many others cannot. Also, when a file has changed its line endings, Git will see it as a change to every single line in the file, even if none of the content has changed.
If you have the utility installed, you can easily convert between the two formats. Simply use «» or «» to convert a file. Notice that the ‘file’ utility says «CRLF» to indicate the «CR» and «LF» ending of a DOS-format text file. Otherwise, it calls it «ASCII text»
# Start with a plain ASCII file:
linux$ file a.txt
a.txt: ASCII text
# Convert it to DOS format:
linux$ unix2dos a.txt
unix2dos: converting file a.txt to DOS format...
# Check its new format:
linux$ file a.txt
a.txt: ASCII text, with CRLF line terminators
# Convert it back to Unix/Linux format:
linux$ dos2unix a.txt
dos2unix: converting file a.txt to Unix format...
# Check it again:
linux$ file a.txt
a.txt: ASCII text
linux$
Fedora, CentOS, RedHat
We will use command like below.
$ sudo dnf install dos2unix
![]() dos2unix Fedora, CentOS, RedHat
dos2unix Fedora, CentOS, RedHat
Hidden Characters Problem
As stated previously there are some characters which are not used in Linux text files but used in Windows text files.
- End of line is specified with Carriage Return `CR` followed by Line Feed `LF` in Windows but In Linux, only Line Feed `LF` is used.
- Default encoding of Windows Files are UTF-16 but in Linux, UTF-8 is used
- Binary files are skipped automatically
Print Given File Encoding and Type
We will start by listing or printing the given file encoding type and line terminator type. We will use the Linux command which provides this information.
$ file a.txt
![]() Print Given File Encoding and Type
Print Given File Encoding and Type
We can see that the file is encoded with the and have or Windows line terminators.
Convert From DOS To Unix Format
We will start with a simple example where we will convert the file which is created in the Windows or MS-DOS environment named into a file which will be used in the Linux environment. will be converted as the same file name.
$ dos2unix a.txt
![]() Convert From DOS To Unix Format
Convert From DOS To Unix Format
After checking with the command we can see that it is referred to as text file without CRLF line terminator.
Specify Conversion Mode
While converting there are different conversion modes which provide alternative about the conversion. We can use the following options and conversion modes.
- `-iso` will convert from default code page into Unix Latin-1
- `-850` will convert from DOS CP850 to Unix Latin-1
- `-1252` will convert from Windows CP1252 to Unix UTF-8 or Unicode
In this example, we will convert to ASCII format with the option.
$ dos2unix -iso a.txt
![]() Specify Conversion Mode
Specify Conversion Mode
We can see that detailed information is provided during conversion.
Keep Date Stamp Of Old File
Timestamps are file attributes those holds information like creation time, modification time, access time etc. While converting a text file from DOS format to Linux format this information will be changed. We can preserve the time stamp information with the option like below.
$ dos2unix -k a.txt
Specify New File Name
Up to now we have converted files and replaced. We can specify a new file name where the converted file content will be written to this new file and old file will be kept without a change. We will use option and specify the new file name.
In this example, we will create the newly converted file name .
$ dos2unix -n a.txt b.txt
![]() Specify New File Name
Specify New File Name
Recursive Convert with find Command
If there are a lot of files to be converted to Unix or Linux text file format converting them one by one is trivial work. We need to run the bulk operation on all files. We can use command which will execute given dos2unix command on all found files which are specified as .
In this example, we will find all text files which is specified with in the current working directory which are specified with and then run command all of these files with the command.
$ find . -name "*.txt" | xargs dos2unix
Вот как исправить пропущенные ошибки run.vbs
Иногда ошибка Run.vbs может появиться на вашем компьютере и вызвать определенные проблемы. Это может быть раздражающей проблемой, и, говоря о проблемах, вот некоторые похожие проблемы, о которых сообщили пользователи:
- Не удается найти файл сценария Windows 7 — это вариант этой проблемы, который также может появиться в Windows 7. Чтобы исправить это, создайте новый профиль пользователя и проверьте, появляется ли проблема по-прежнему.
- Ошибка Run.vbs Windows 7, 8.1, 10 — К сожалению, эта ошибка может появиться в любой версии Windows, и предыдущие версии Windows не являются исключением. Однако вы можете решить эту проблему, используя одно из наших решений.
- Ошибка Run.vbs при запуске — если эта проблема появляется прямо при запуске, скорее всего, проблема вызвана вредоносным ПО. Чтобы устранить проблему, измените реестр и выполните полную проверку системы.
Conversion
DOS,
All versions of dos2unix and unix2dos can convert UTF-8 encoded files, because
UTF-8 was designed for backward compatiblity with ASCII.
Dos2unix and unix2dos with Unicode UTF-16 support, can read little and big
endian UTF-16 encoded text files. To see if dos2unix was built with UTF-16
support type "dos2unix -V".
The Windows versions of dos2unix and unix2dos convert UTF-16 encoded files
always to UTF-8 encoded files. Unix versions of dos2unix/unix2dos convert
UTF-16 encoded files to the locale character encoding when it is set to UTF-8.
Use the locale(1) command to find out what the locale character encoding is.
Because UTF-8 formatted text files are well supported on both Windows and Unix,
dos2unix and unix2dos have no option to write UTF-16 files. All UTF-16
characters can be encoded in UTF-8. Conversion from UTF-16 to UTF-8 is without
loss. UTF-16 files will be skipped on Unix when the locale character encoding
is not UTF-8, to prevent accidental loss of text. When an UTF-16 to UTF-8
conversion error occurs, for instance when the UTF-16 input file contains
an error, the file will be skipped.
Footnote: /bin/bash^M: bad interpreter: No such file or directory
If you have a shell script like this, it can be difficult to work out why it isn’t working:
linux$ cat a.sh
#!/bin/bash
echo "Hello, World!"
linux$ ./a.sh
bash: ./a.sh: /bin/bash^M: bad interpreter: No such file or directory
linux$
If your script is in DOS format, will show it like this:
linux$ od -c a.sh
0000000   #   !   /   b   i   n   /   b   a   s   h  \r  \n   e   c   h
0000020   o       "   H   e   l   l   o   ,       W   o   r   l   d   !
0000040   "  \r  \n
0000043
linux$
Notice that the first line is «». The final will be treated as a linebreak, but the kernel will try to execute your chosen interpreter, which you have said is named «» — as mentioned above, some tools display «» as «» — there are multiple ways of displaying these non-printable characters.
So the kernel is complaining that it cannot find an interpreter called «». There is no file with that name. There is probably a , but that’s not what it’s been asked to find. It’s been asked to find «». And yes, computers really are that dumb. It’s a good thing that they’re so precise, but a pain that they’re so pedantic. You can’t have one without the other.
This has confused many people many times over many years, but the fix is simple: Convert the file from DOS format to Unix format:
linux$ ./a.sh
bash: ./a.sh: /bin/bash^M: bad interpreter: No such file or directory
linux$ dos2unix a.sh
dos2unix: converting file a.sh to Unix format...
linux$ ./a.sh
Hello, World!
linux$
You’re welcome! Feel free to buy me a cup of coffee, if this saved your skin!
LOCALIZATION
- LANG
-
The primary language is selected with the environment variable LANG. The LANG
variable consists out of several parts. The first part is in small letters the
language code. The second is optional and is the country code in capital
letters, preceded with an underscore. There is also an optional third part:
character encoding, preceded with a dot. A few examples for POSIX standard type
shells:export LANG=nl Dutch export LANG=nl_NL Dutch, The Netherlands export LANG=nl_BE Dutch, Belgium export LANG=es_ES Spanish, Spain export LANG=es_MX Spanish, Mexico export LANG=en_US.iso88591 English, USA, Latin-1 encoding export LANG=en_GB.UTF-8 English, UK, UTF-8 encodingOn Unix systems you can use the command locale(1) to get locale specific
information. - LANGUAGE
- DOS2UNIX_LOCALEDIR
-
With the environment variable DOS2UNIX_LOCALEDIR the LOCALEDIR set
during compilation can be overruled. LOCALEDIR is used to find the
language files. The GNU default value is "/usr/local/share/locale".
Option —version will display the LOCALEDIR that is used.Example (POSIX shell):
export DOS2UNIX_LOCALEDIR=$HOME/share/locale -

Решение 8 — Создать новую учетную запись пользователя
Если вы продолжаете получать сообщение об ошибке run.vbs на своем компьютере, вы можете решить эту проблему, просто создав новую учетную запись пользователя. Иногда эта проблема может повлиять только на вашу учетную запись, но вы можете исправить это, выполнив следующие действия:
- Зайдите в Настройки приложения > Аккаунты .
- Перейти к семье и другим людям . Выберите Добавить кого-то еще к этому ПК в правой панели.
- Выберите У меня нет информации для входа этого человека .
- Теперь выберите Добавить пользователя без учетной записи Microsoft .
- Введите желаемое имя пользователя и нажмите Далее .
Если вы не можете получить доступ к приложению «Настройки» из-за этой проблемы, вы можете создать учетную запись пользователя из командной строки. Для этого выполните следующие действия:
- Запустите командную строку от имени администратора.
- После запуска командной строки выполните следующие команды:
- net user / добавьте ваше_имя_пользователя
- новые администраторы локальной группы your_username / add
После выполнения этих двух команд вы создадите новую учетную запись администратора на своем ПК. Просто переключитесь на новую административную учетную запись и проверьте, появляется ли там проблема.
Если проблема отсутствует в новой учетной записи, переместите в нее свои личные файлы и начните использовать ее вместо старой учетной записи.
Ошибка Run.vbs может быть довольно неприятной, но мы надеемся, что вам удалось исправить это с помощью одного из наших решений.
Примечание редактора : этот пост был первоначально опубликован в январе 2017 года и с тех пор был полностью переработан и обновлен для обеспечения свежести, точности и полноты.
Example: Converting a Sample File from DOS to Unix Format
Let’s say you downloaded a file named sample-dos-file.
![]()
By opening the file using the Vim/Vi text editor, you would see that after each line ending there is (a carriage return).
![]()
Another way to see the file uses both carriage return and line feed for line endings is to view the file in octal values.
To do so, run the command:
The output displays the content of the file with its octal values, as in the image below. You can see that each line end is marked with the octal values 015 (\r) and 012 (\n).
![]()
Now, to convert the file and remove all carriage return endings, you would run the command:
![]()
Open the same file in Vim/Vi. It doesn’t include any symbols signaling the line ending.
![]()
To confirm the file is in Unix format, you can also open view the content in octal values. The output should display just the 012 values for \n.
![]()
Conclusion
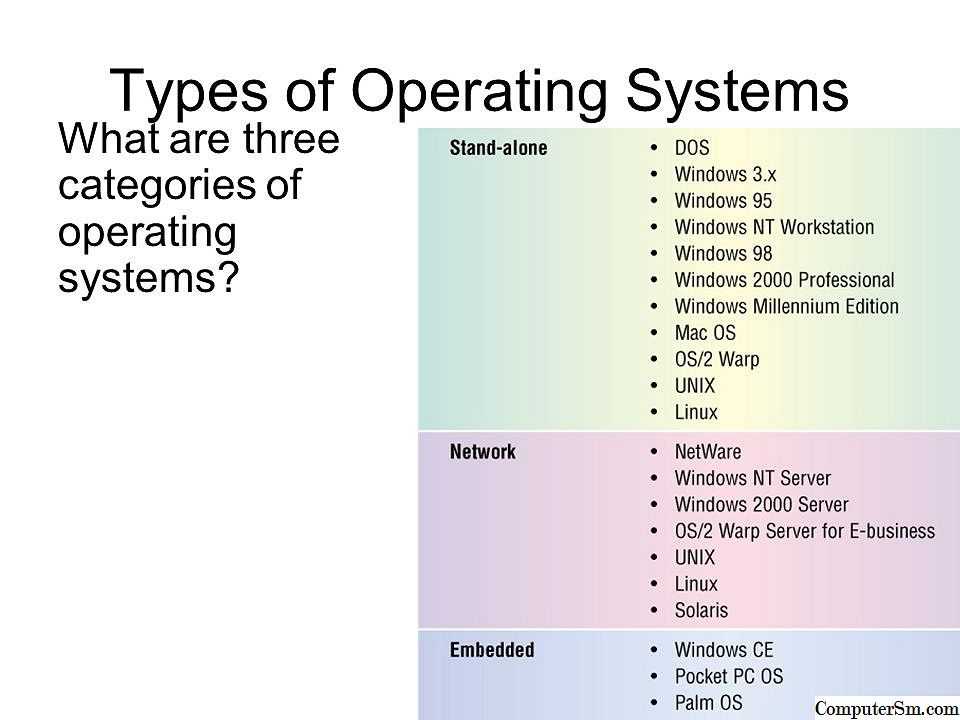
This article showed six ways to convert a DOS file into a Unix format and vice versa.
The simplest and recommended way is using the command. If you cannot utilize , you have five other options to choose from.
9 ответов
Лучший ответ
Проблема в том, что отсутствует в вашем , если он установлен локально.
Вам следует изменить свой , чтобы включить полный путь к .
Строка, которую нужно изменить, вероятно, равна .
Вы должны изменить его на и добавить к своим аргументам следующее: (в Windows).
Это проинструктирует VSCode:
- Запустите NodeJS (он должен быть установлен глобально).
- Передайте локальную установку Typescript в качестве сценария для запуска.
(это почти то, что делает исполняемый файл )
Вы уверены, что не хотите устанавливать Typescript глобально? Это должно упростить задачу, особенно если вы только начинаете его использовать.
42
zlumer
13 Фев 2016 в 09:59
Я тоже столкнулся с той же проблемой. Используйте командную строку nodeJS вместо командной строки Windows.
Шаг 1. Выполните
Шаг 2:
Новый файл будет иметь то же имя и другое расширение, что и « .js ».
Шаг 3:
Вы можете увидеть результат на экране. Меня устраивает.
Srinivasan.S
31 Июл 2018 в 20:15
Вам нужно запустить:
… вместо того, чтобы просто вызывать , как команда Windows, как, кажется, предлагают все остальные.
Если у вас не установлен , вам следует это сделать. Он должен быть установлен глобально (в отличие от Typescript). Итак, сначала запустите:
..затем запустите .
6
MSOACC
26 Авг 2020 в 11:24
В файле VSCode попытается найти командный сценарий tsc windows в некоторой папке, которую он считает папкой ваших модулей.
Если вы знаете, куда сохраняется команда или , я бы рекомендовал заменить:
С участием
Где — это папка, содержащая мой исполняемый файл tsc windows
Определит, где мой vscode изначально указывает прямо сейчас, чтобы найти tsc и исправить его, я думаю.
8
Danh
16 Ноя 2016 в 02:03
Для окон
После установки машинописи глобально
Просто выполните поиск по запросу «командная строка node.js»
Введите командную строку
Здесь мы видим, что команда tsc работает, теперь перейдите в свою папку и введите
Он соответствует ts файлу js.
10
Ashutosh Jha
7 Июн 2019 в 07:11
В качестве альтернативы вы можете использовать npm, который автоматически просматривает папку .bin. Тогда вы можете использовать tsc
-1
Dirk Bäumer
18 Фев 2016 в 16:19
Для меня, запустив Visual Studio Code от имени администратора, проблема решена.
hoanvd1210
12 Май 2020 в 09:31
Может быть причина, по которой не установлен глобально, поэтому установите его
Если вы хотите преобразовать файлы в , сделайте это в соответствии с вашими потребностями
57
WasiF
19 Май 2019 в 05:25
Вы пропустили установку машинописного текста, просто выполните команду ниже и попробуйте tsc —init
2
Nicholas K
8 Дек 2018 в 06:43
9 ответов
Лучший ответ
В разрешении отказано
Для запуска сценария файл должен иметь установленный бит разрешения на выполнение .
Чтобы полностью понять Linux, вы можете изучить документация по команде . chmod, сокращение от режима изменения , команда, которая используется для изменения настроек разрешений для файла.
![Bash - запуск скрипта в коде visual studio (в окнах) на wsl ubuntu возвращает & ldquo; строка 2: $ '\ r': команда не найдена & rdquo; [закрыто]](https://fuzeservers.ru/wp-content/uploads/8/3/9/839119e117dc62f4350438332d02d316.png)
Чтобы прочитать документацию chmod для вашей локальной системы, запустите или из командной строки. После прочтения и понимания вы сможете понять результат работы …
… который будет перечислять разрешения READ, WRITE и EXECUTE для владельца файла, владельца группы и всех остальных, кто не является владельцем файла или членом группы, к которой принадлежит файл (эта последняя группа разрешений иногда упоминается как «мир» или «другое»)
Вот краткое описание того, как устранить ошибку Permission Denied в вашем случае.
Владелец имеет права чтения и записи rw, но — указывает на то, что разрешение на исполняемый файл отсутствует.
Команда исправляет это. (Группа и другие имеют разрешение только на чтение для файла, они не могут писать в него или выполнять его)
Foo.sh теперь является исполняемым для Linux.
Использование sudo приводит к тому, что команда не найдена
Когда вы запускаете команду с помощью sudo , вы фактически запускаете ее как суперпользователь или root.
Причина того, что пользователь root не находит вашу команду, вероятно, состоит в том, что переменная среды для root не включает каталог, в котором находится . Следовательно, команда не найдена.
Переменная среды PATH содержит список каталогов, в которых выполняется поиск команд. Каждый пользователь устанавливает свою собственную переменную PATH в соответствии со своими потребностями. Чтобы узнать, что он настроен для запуска
Вот пример вывода вышеупомянутой команды сначала от имени обычного пользователя, а затем от имени пользователя root с помощью sudo
Обратите внимание, что, хотя и похоже, в этом случае каталоги, содержащиеся в PATH для непривилегированного пользователя (rkielty) и суперпользователя, не совпадают. Каталог, в котором находится , отсутствует в переменной PATH пользователя root, поэтому ошибка команда не найдена
Каталог, в котором находится , отсутствует в переменной PATH пользователя root, поэтому ошибка команда не найдена .
173
Rob Kielty
7 Дек 2013 в 01:57
Кажется, команда не найдена
Чтобы проверить, установлен ли пакет sudo в вашей системе, введите и нажмите Enter. Если вы установили , система отобразит короткое справочное сообщение, в противном случае вы увидите что-то вроде
Чтобы установить sudo, выполните одну из следующих команд, используя учетную запись root:
# Если ваша система основана на подходящем диспетчере пакетов
# Если ваша система основана на менеджере пакетов yum
-2
Khaled Eid
15 Сен 2020 в 21:50
Хорошо, это мое решение: в ~ / .bash_aliases просто добавьте следующее:
Вуаля! Теперь вы можете выполнять свои собственные сценарии с помощью sudo или устанавливать как ROOT, не выполняя каждый раз экспорт PATH = $ PATH: / home / your_user / bin.
Обратите внимание, что мне нужно указывать явно при добавлении моего PATH, поскольку HOME для суперпользователя — / root
1
Fernando D Jaime
1 Июн 2016 в 03:56
Попробуйте вместо , если у вас возникли проблемы с указанными выше руководствами. Это сработало для меня, когда другие решения не работали.
3
Peter David Carter
13 Июл 2017 в 15:09
Кажется, что linux скажет «команда не найдена», даже если вы явно укажете путь к файлу.
Это несколько вводящая в заблуждение ошибка, но, вероятно, технически правильная. Файл не является командой до тех пор, пока не будет исполнен, и поэтому не может быть найден.
3
Jeff MacDonald
28 Июл 2015 в 13:56
Вы также можете создать мягкую ссылку на свой сценарий в одном из каталогов (например, ) в PATH суперпользователя. Затем он будет доступен для sudo.
Взгляните на этот ответ, чтобы понять, в какой каталог поместить программную ссылку.
6
Rob Kielty
18 Май 2017 в 00:16
- Убедитесь, что у вас есть разрешение на выполнение сценария. т.е.
- Убедитесь, что первая строка этого сценария — или что-то в этом роде.
- Для sudo вы находитесь в неправильном каталоге. уточняйте у
7
Ed Heal
21 Окт 2012 в 09:08
Проверьте secure_path в sudo
Если переопределяется, используйте и отредактируйте
26
codemonkee
25 Сен 2013 в 03:11
Другие решения, которые я видел здесь, основаны на некоторых определениях системы, но на самом деле возможно, чтобы использовал текущий (с командой ) и / или остальная часть среды (с параметром ), просто вызвав его правильно:
Фактически, из него можно сделать псевдоним:
(Также возможно назвать сам псевдоним , заменив исходный .)
116
Tom
1 Апр 2015 в 20:53


![Папка продолжает возвращаться только для чтения [решено] - gadgetshelp,com](http://fuzeservers.ru/wp-content/uploads/2/d/3/2d310fee7eca4e8c0d505d2b78421c8c.jpeg)
