
Функции
strongSwan поддерживает IKEv1 и полностью реализует IKEv2.
Возможности IKEv1 и IKEv2
- strongSwan предлагает плагины, улучшающие его функциональность. Пользователь может выбрать одну из трех криптографических библиотек (устаревшие FreeS / WAN, OpenSSL и gcrypt).
- Используя плагин openssl, strongSwan поддерживает криптографию Elliptic Curve (группы ECDH, сертификаты и подписи ECDSA) как для IKEv2, так и для IKEv1, так что возможна совместимость с реализацией Microsoft Suite B в Vista, Win 7, Server 2008 и т. Д.
- Автоматическое назначение виртуальных IP-адресов VPN-клиентам из одного или нескольких пулов адресов с использованием полезной нагрузки IKEv1 ModeConfig или IKEv2 Configuration. Пулы либо изменчивы (т. Е. Основаны на ОЗУ), либо хранятся в базе данных SQLite или MySQL (с настраиваемым временем аренды).
- IPSec пул утилита командной строки позволяет управлять пулами IP — адреса и настройки атрибутов , как внутренний DNS и серверы NBNS.
Только функции IKEv2
- Демон IKEv2 по своей сути является многопоточным (по умолчанию 16 потоков).
- Демон IKEv2 поставляется с опцией высокой доступности на основе IP-адреса кластера, где в настоящее время кластер из двух хостов выполняет активное распределение нагрузки, и каждый хост может принимать состояния ESP и IKEv2 без смены ключей в случае сбоя другого хоста.
- Поддерживаются следующие методы аутентификации EAP: AKA и SIM, включая управление несколькими SIM-картами, MD5, MSCHAPv2, GTC, TLS, TTLS. EAP-MSCHAPv2 аутентификация на основе паролей пользователей и EAP-TLS с пользовательскими сертификатами совместимы с Windows 7 Agile VPN Client.
- Плагин EAP-RADIUS ретранслирует пакеты EAP на один или несколько серверов AAA (например, FreeRADIUS или Active Directory).
- Поддержка RFC 5998 EAP-Only Authentication в сочетании со строгими методами взаимной аутентификации, такими как EAP-TLS.
- Поддержка обмена множественной аутентификацией RFC 4739 IKEv2.
- Поддержка перенаправления IKEv2 RFC 5685.
- Поддержка протокола мобильности и множественной адресации RFC 4555 (MOBIKE), который позволяет динамически изменять IP-адрес и / или сетевой интерфейс без смены ключей IKEv2. MOBIKE также поддерживается клиентом Windows 7 Agile VPN.
- Аплет strongSwan IKEv2 NetworkManager поддерживает EAP, сертификат X.509 и аутентификацию на основе смарт-карты PKCS # 11. Назначенные DNS-серверы автоматически устанавливаются и снова удаляются в /etc/resolv.conf.
- Поддержка Trusted Network Connect (TNC). VPN-клиент strongSwan может действовать как клиент TNC, а VPN-шлюз strongSwan — как точка применения политики (PEP) и, опционально, как совместно расположенный сервер TNC. Поддерживаются следующие интерфейсы TCG : IF-IMC 1.2, IF-IMV 1.2, IF-PEP 1.1, IF-TNCCS 1.1, IF-TNCCS 2.0 (RFC 5793 PB-TNC), IF-M 1.0 (RFC 5792 PA-TNC) и IF-MAP 2.0.
- Демон IKEv2 был полностью перенесен на операционную систему Android, включая интеграцию в приложение Android VPN. Он также был перенесен на операционные системы Maemo, FreeBSD и macOS.
Шаг 6 — Настройка брандмауэра и переадресации IP ядра
После настройки конфигурации StrongSwan нам нужно настроить брандмауэр, чтобы он разрешал трафик VPN и перенаправлял его.
Если вы выполнили указания предварительных обучающих модулей, у вас должен быть включен базовый брандмауэр UFW. Если вы еще не настроили UFW, вы можете базовую конфигурацию и включить ее с помощью следующей команды:
Теперь добавьте правило, которое будет разрешать трафик UDP на стандартных портах IPSec, 500 и 4500:
Затем мы откроем один из файлов конфигурации UFW, чтобы добавить несколько политик нижнего уровня для маршрутизации и перенаправления пакетов IPSec. Перед этим нам нужно будет определить, какой сетевой интерфейс нашего сервера будет использоваться для доступа к интернету. Для этого мы можем отправить запрос интерфейса, связанного с маршрутом по умолчанию:
Ваш публичный интерфейс должен содержать слово «dev». Например, в этом результате показан интерфейс с именем , который выделен ниже:
Определив интерфейс публичной сети, откройте файл правил в своем текстовом редакторе:
Добавьте в верхнюю часть файла (перед строкой ) следующий блок конфигурации:
/etc/ufw/before.rules
Измените каждый экземпляр в конфигурации выше для соответствия имени интерфейса, которое вы определили с помощью . Строки создают правила, благодаря которым брандмауэр может обеспечивать маршрутизацию и управление трафиком между клиентами VPN и интернетом. Строка позволяет настроить максимальный размер сегмента пакета, чтобы предотвратить возможные проблемы с некоторыми клиентами VPN.
После строки и строк определения цепочки нужно добавить еще один блок конфигурации:
/etc/ufw/before.rules
Эти строки указывают брандмауэру перенаправлять трафик ESP (защищенная инкапсуляция полезной нагрузки), чтобы дать клиентам VPN возможность подключения. ESP обеспечивает дополнительную защиту пакетов VPN, когда они проходят через ненадежные сети.
Завершив редактирование, сохраните и закройте файл.
Прежде чем перезапустить брандмауэр, нам нужно изменить некоторые параметры ядра сети, чтобы разрешить маршрутизацию с одного интерфейса на другой. Откройте файл конфигурации параметров ядра UFW:
Нам нужно настроить несколько параметров:
- Прежде всего, мы активируем перенаправление пакетов PIv4.
- Мы отключим обнаружение путей MTU, чтобы предотвратить проблемы с фрагментацией пакетов.
- Также мы запретим перенаправление ICMP и отправку перенаправлений ICMP, чтобы предотвратить атаки через посредников.
Внесенные в файл изменения выделены в приведенном ниже фрагменте кода:
/etc/ufw/sysctl.conf
Завершив изменения, сохраните файл. UFW применит эти изменения при следующем запуске.
Теперь мы можем активировать все изменения, отключив и снова включив брандмауэр:
Вам будет предложено подтвердить процесс. Введите , чтобы активировать UFW с новыми настройками.
Preshared Keys (PSKs)
A strong alternative to PSKs is the use of PSKs are usually a lot shorter than RSA keys and have a lot less entropy, so cryptographically speakingthey often are a lot weaker than RSA keys. Therefore, to securely use PSKs, they have to be very long andrandom. A good way to generate strong PSKs is to Base64-encode data from (the output ofthe following command can be used with the prefix in ipsec.secrets):
dd if=/dev/urandom count=1 bs=32 2>/dev/null | base64
If the PSK is leaked, an attacker can mount a man-in-the-middle attack to impersonate either side andintercept the traffic over the tunnel.
PSK authentication and aggressive mode
Aggressive mode is inherently flawed, as a hash of the PSK is transmitted in the clear, which an attackercan use to attack the PSK using an offline dictionary attack. It is strongly advised to avoid aggressive mode.
Forwarding Client Traffic
In order to forward traffic to hosts behind the gateway (or hosts on the Internet if split-tunneling is not used) the followingoption has to be enabled on Linux gateways:
sysctl net.ipv4.ip_forward=1
sysctl net.ipv6.conf.all.forwarding=1
This can be added to to enable it permanently.
If the firewall on the gateway is rather restrictive, leftfirewall=yes will automatically cause the default updown script to addrules that allow traffic to be forwarded.
In remote access situations clients will be assigned a virtual IP address from a configured address pool. How a gateway canassign these to clients is already explained elsewhere. The important part is that in order to respond to requests from hostsfrom that virtual subnet, the hosts to which the gateway forwards traffic to have to know that they must send packets for thesehosts to the VPN gateway.
Please note that there might be additional considerations when hosting on cloud platforms (e.g. src/dst address checks).
Hosts on the LAN
For hosts on the LAN behind the gateway the following situations are possible:
The virtual IPs are from the subnet behind the gateway: In this situation either the dhcp plugin is used or thegateway assigns virtual IP addresses from a subnet of the whole LAN behind the gateway (distinct from the IP addressesassigned via DHCP to other LAN hosts). If that is the case, the farp plugin must be used so that the hosts behind thegateway may learn that they have to send response packets to the VPN gateway. For IPv6 something similar can be doneusing NDP proxying (see #1008).
The virtual IPs are from a distinct subnet / In site-to-site scenarios: If the VPN gateway is the default gateway ofthe accessed LAN nothing special has to be done. If it is not, either add a route to all hosts behind the gateway (manuallyor e.g. via DHCP option 121) telling them that the subnet from which virtual IP addresses are assigned to roadwarriors(or other subnets in site-to-site scenarios) can be reached through the VPN gateway, or configure a static route on theactual default gateway, which directs traffic for the virtual subnet to the VPN gateway. It’s also possible to NAT the virtual IPsto the (internal) IP address of the gateway, so that requests from clients will look to LAN hosts as if they originated from thegateway (see the next section for notes on setting up a NAT).
If the VPN gateway is not the default gateway of the LAN, ICMP redirects might get returned to hosts if they send trafficdestined for the remote hosts/subnets to the VPN gateway, directing them to the default gateway of the LAN (which probablydoesn’t work and otherwise might get that traffic out unencrypted). To avoid this, disable sending such ICMP messages bysetting and to (if the latter is not setbefore the interface comes up, also set the option for the individual interface, i.e. ).
Hosts on the Internet
The situation here is similar to the one for LAN hosts above. If the gateway would simply forward traffic from the virtual subnetto hosts on the Internet these wouldn’t be able respond (they would send their response to the virtual IP address).What is required, therefore, are NAT rules so that hosts in the virtual subnet are mapped to at least one IP address of the VPNgateway (which itself could be behind a NAT device too). For hosts on the Internet, traffic from the virtual subnet appears tooriginate from the VPN gateway.
By way of example, let’s assume the gateway assigns virtual IPs from the 10.0.3.0/24 subnet to its roadwarrior clients. Thefollowing iptables rules will NAT traffic from that subnet to the gateway’s eth0 interface (this works even for gateways thathave only one network interface).
iptables -t nat -A POSTROUTING -s 10.0.3.0/24 -o eth0 -m policy --dir out --pol ipsec -j ACCEPT
iptables -t nat -A POSTROUTING -s 10.0.3.0/24 -o eth0 -j MASQUERADE
The first rule exempts traffic that matches an IPsec policy from the NAT rule. Additional subnets behind the gateway may belisted after -s, like -s 10.0.3.0/24,192.168.88.0/24. The -s option may also be omitted altogether to match all outbound traffic.
Before 5.0.0
In releases before 5.0.0 IKEv1 connections were handled by the separate pluto keying daemon. The ipsec command then used the ipsec whack command in addition to the ipsec stroke command to communicate with pluto.
List Commands
ipsec listcards
lists all certificates found on attached smart cards. Supported by the IKEv1 pluto daemon only. Implemented by calling the ipsec whack —listcards command.
PKCS11 Proxy Commands
ipsec scencrypt <value>
Supported by the IKEv1 pluto daemon only. Implemented by calling the ipsec whack —scencrypt command.
ipsec scdecrypt <value>
Supported by the IKEv1 pluto daemon only. Implemented by calling the ipsec whack —scdecrypt command.
![Ipsec — протокол защиты сетевого трафика на ip-уровне [айти бубен]](https://fuzeservers.ru/wp-content/uploads/8/f/4/8f417a4533a381221bebde8b9e9e6526.jpeg)


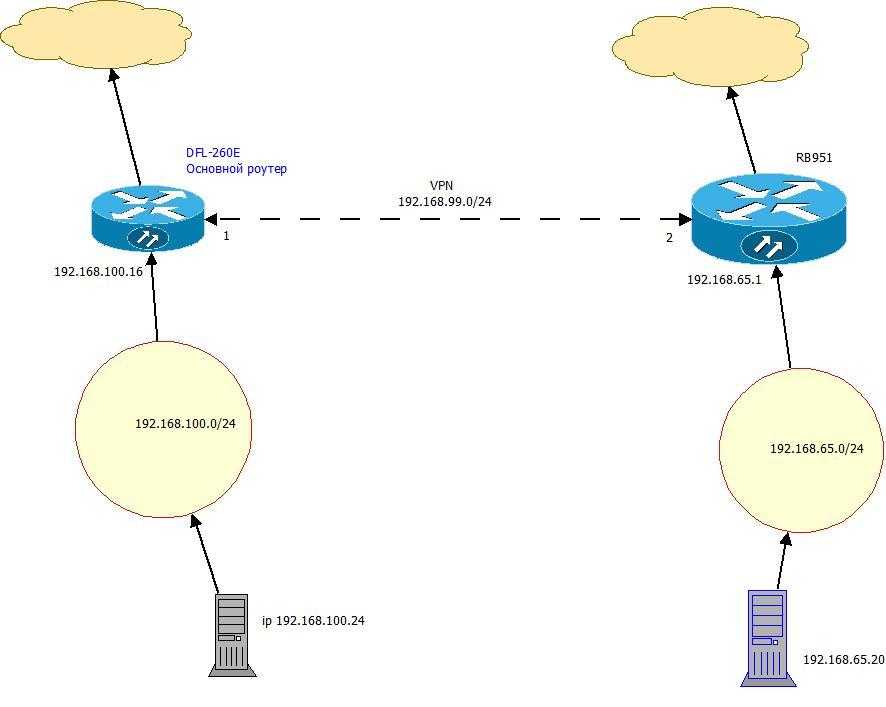
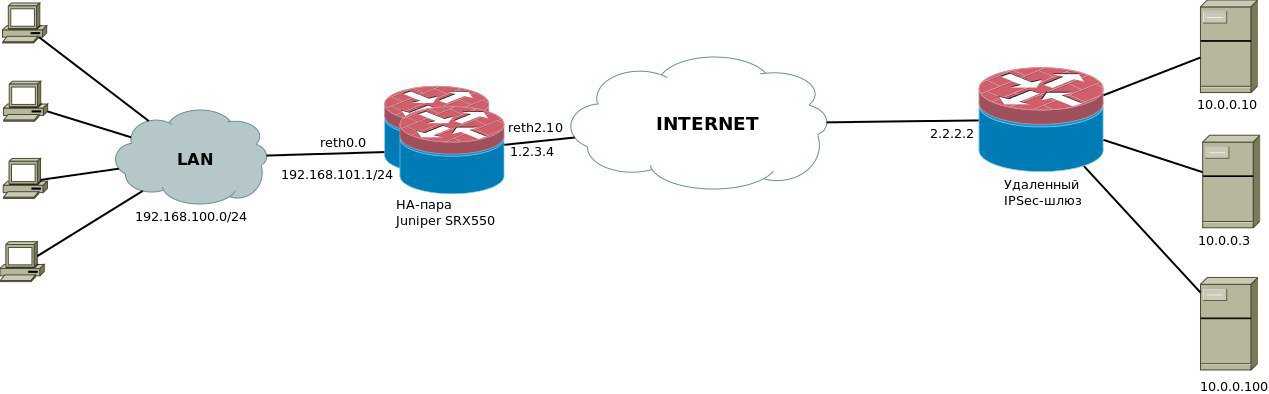
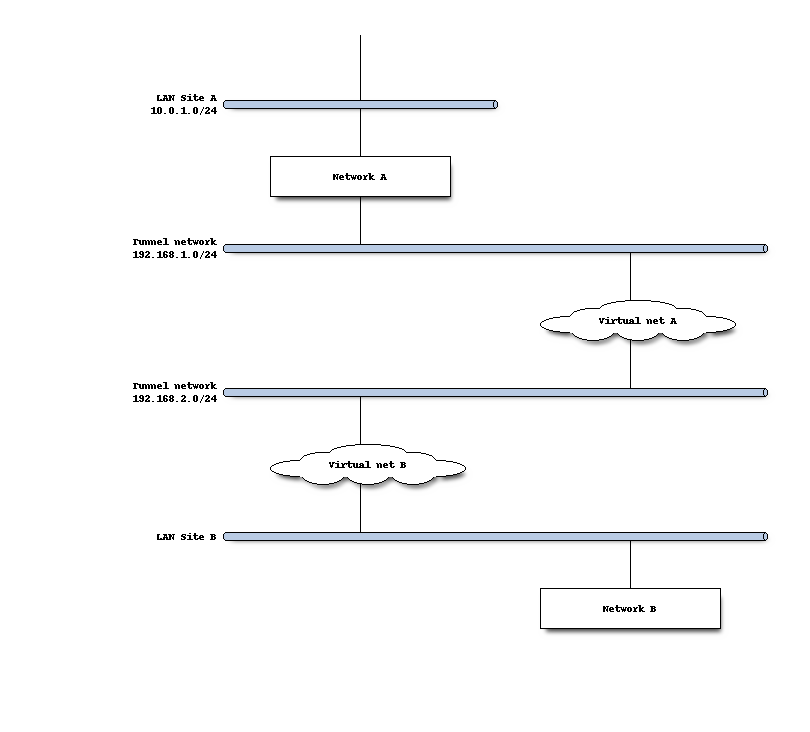
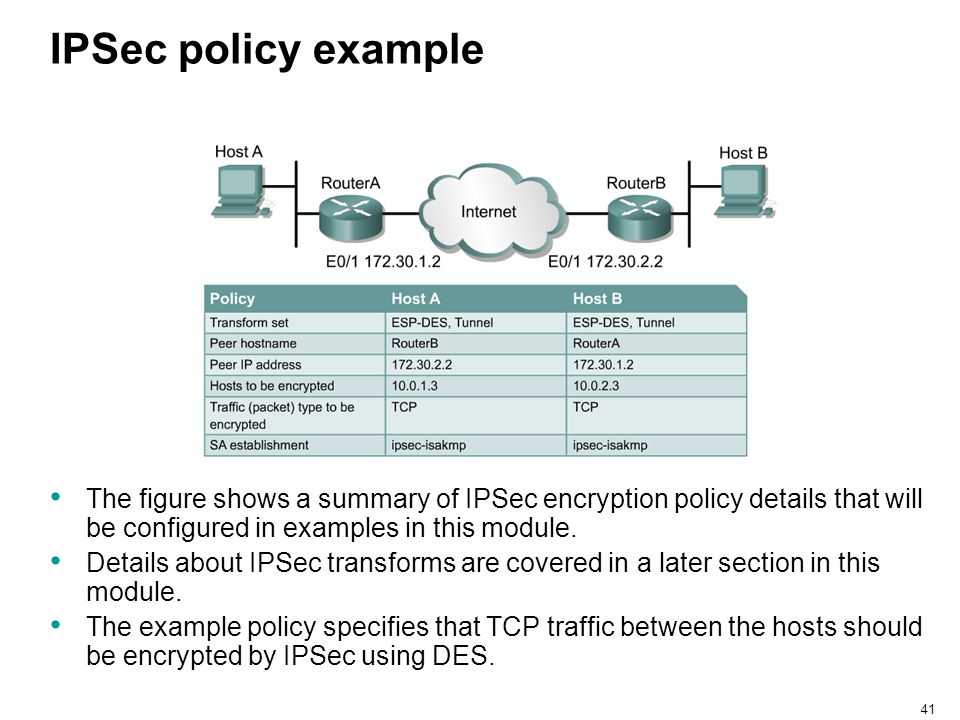
Настройки для способа Сайт-в-сайт
Для настройки подключений типа Сайт-в-сайт (между сайтами, между территориально удалёнными участками физических подсетей) можно обратится к любой ситуации из раздела «net2net» справочного руководства.
Наиболее важное различие по сравнению со случаем предоставления обычного (roadwarrior) удалённого доступа заключается в том, что инициатор на соединение к подключению не будет запрашивать виртуальный IP-адрес, а вместо этого, инициатор будет использовать параметр настройки «leftsubnet» для туннелирования трафика из одной или более локальных подсетей. Для IKE-v2 сразу несколько подсетей (в нотации CIDR) могут быть добавлены в значение параметра «left|rightsubnet», при этом они должны быть разделены запятыми
В том случае, если используется IKE-v1, то должен быть добавлен отдельный каждый раздел «conn» соответственно для каждой конкретной определённой подсети типов «left» и «right» сразу как только будет использована первая подсеть в параметре «left|rightsubnet» (Hint: при помощи раздела «conn %default» или ключевого слова «also» можно уменьшить объём каждого из разделов «conn» на несколько строчек).
Один момент, который часто смущает новичков в IPsec, тестирование ситуации «net-to-net» от имени любого из шлюзов часто требует принудительного указания IP-адреса источника (например, тестирование с утилитой «ping -I»), так как внешние IP-адреса любого из шлюзов могут просто напросто не входить в туннелированные подсети. В противном случае, либо просто добавьте внешние IP-адреса в список подсетей в «left|rightsubnet» либо добавьте определённую конкретную настройку хост-в-хост.
Основы аутентификации
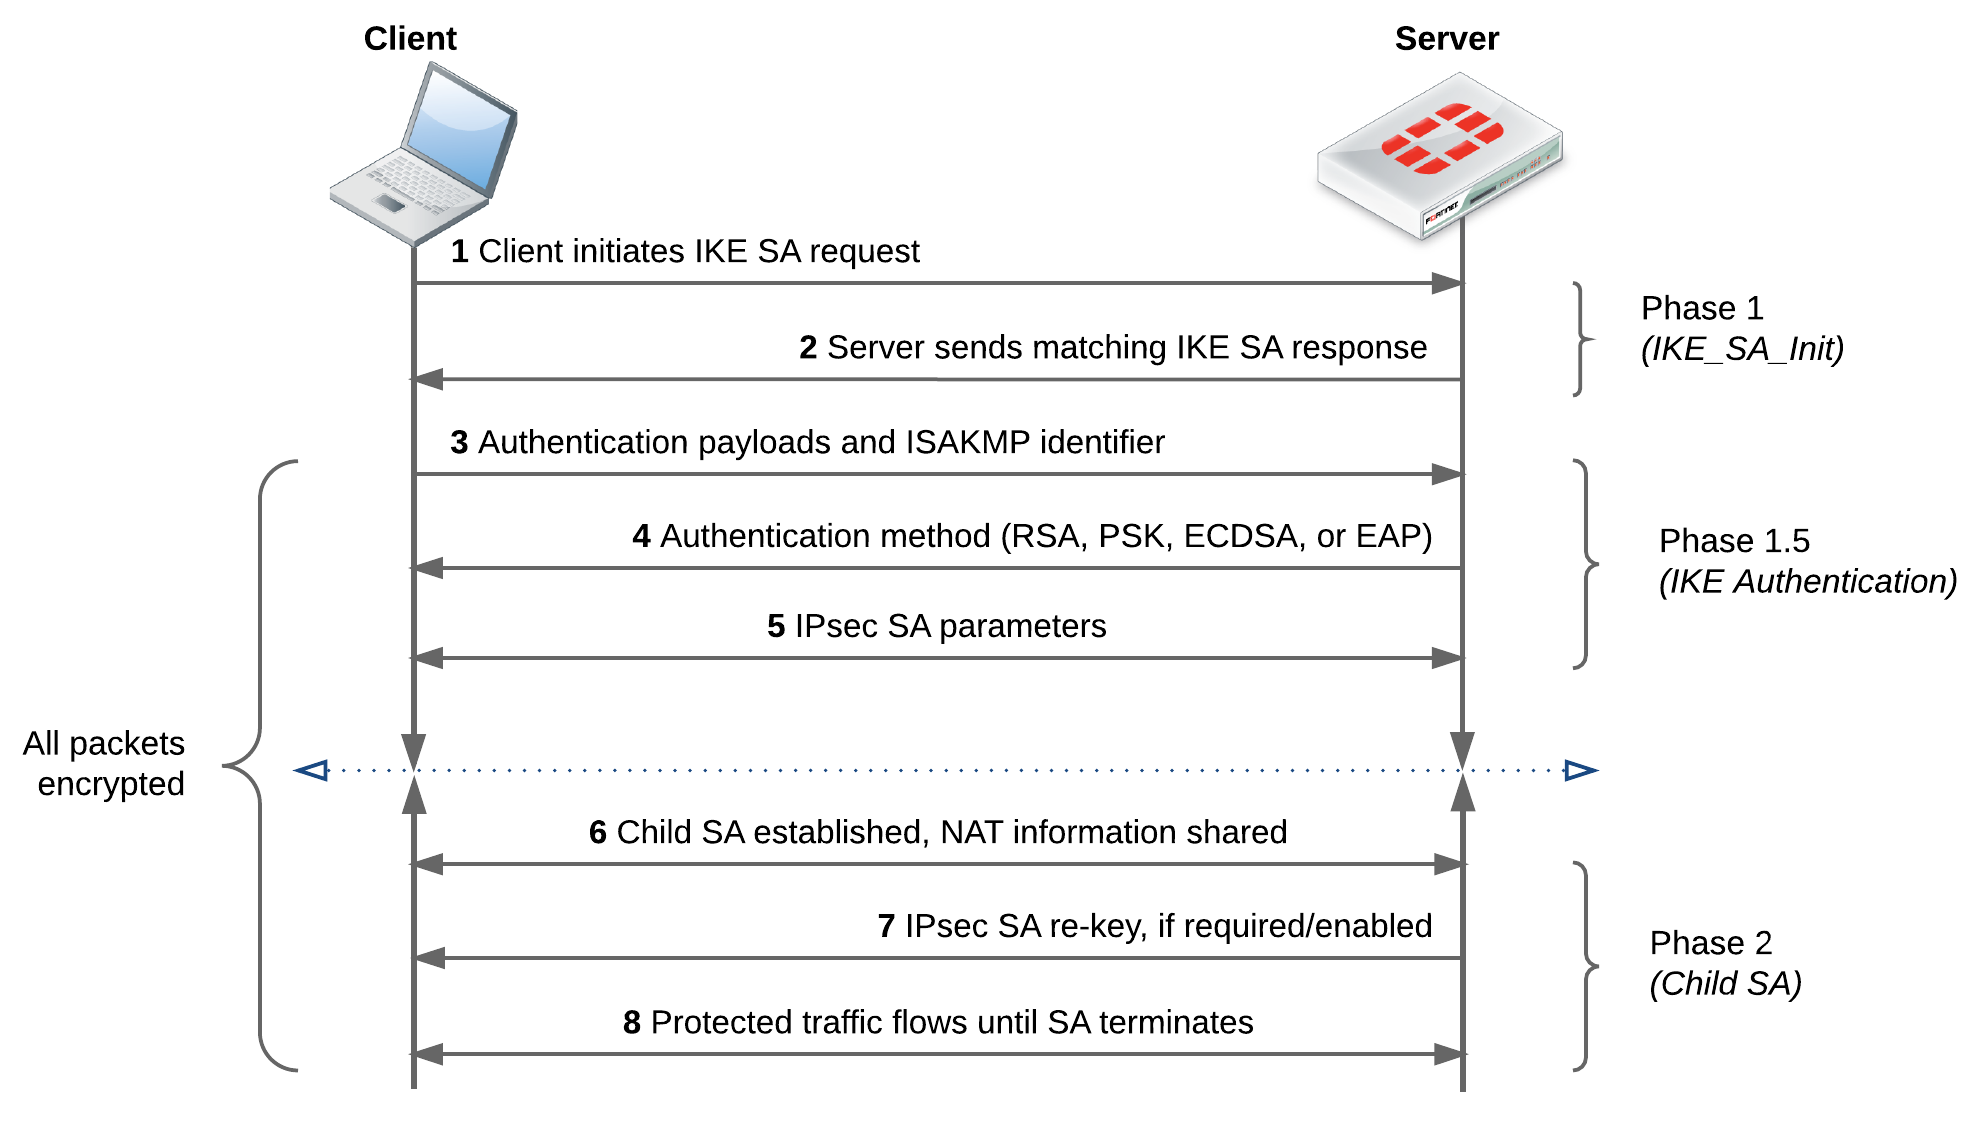
Для проверки гарантии того, что пир с которым установлены IKE_SA действительно является тем за кого он себя выдаёт, пир обязан аутентифицироваться (не авторизоваться, а пройти проверку подлинности).
Для того чтобы это сделать, strongSwan предоставляет несколько способов:
1. Аутентификация с открытым ключом (Public Key Authentication, PKA): Этот способ для проверки подлинности пиров использует X.509-сертификаты RSA или ECDSA.
- Сертификаты могут быть самоподписанными, в этом случае они должны быть установлены на всех пирах, или быть подписанными общим для всех пиров центром сертификации (ЦС, Certificate Authority, CA). Последний вариант гораздо намного упрощает развёртывание и настройку, так как шлюзу потребуется всего лишь только CA-сертификат для проверки подлинности абсолютно всех пиров, у которых тоже имеется действительный сертификат, подписанный тем же самым CA.
- Список отозванных сертификатов (Certificate Revocation Lists, CRL) или система проверки статуса сертификата (Online Certificate Status Protocol, OCSP) могут использоваться для проверки сертификатов на валидность.
- Для безопасного хранения закрытых ключей для смарт-карт используйте плагин PKCS#11
-
В целях предотвращения атак типа человек-посередине (man-in-the-middle), личность пира обязана быть подтверждена сертификатом, либо субъектом или при помощи расширения ‘?SubjectAltName’.
2. Предварительно согласованный ключ (Pre-Shared-Key, PSK): Предварительно согласованный ключ (PSK) является очень простым в развёртывании вариантом, но этот способ для усиления безопасности требует также соответствующей усиленной строгости ключа (PSK).
В случае, если PSK известен большинству пользователей (что очень часто бывает с IKEv1 XAuth при помощи PSK), то любой пользователь, который знает ключ (PSK) может подменить своим или любым хостом шлюз. Именно поэтому этот метод крайне не рекомендуется для случаев крупномасштабного развёртывания.
3. Расширяемый протокол аутентификации (Extensible Authentication Protocol, EAP): Этот способ охватывает несколько возможных методов аутентификации, некоторые из них основаны на аутентификации при помощи пары имя_пользователя/пароль (логин/пароль) (EAP-MD5, EAP-MSCHAPv2, EAP-GTC) или на аутентификации при помощи сертификатов (EAP-TLS), а некоторые могут даже туннелировать другие EAP-методы (EAP-TTLS, EAP-PEAP).
- Фактическая проверка подлинности пользователей может быть полностью передана на RADIUS-сервер с плагином «eap-radius».
- EAP-аутентификация может использоваться совместно с IKE-v2 и для некоторых методов IKE-v1 с использованием плагина xauth-eap.
4. Расширенная аутентификация (eXtended Authentication, XAuth): XAuth предоставляет гибкую структуру проверки подлинности в IKE-v1. XAuth в основном используется для аутентификации при помощи пары имя_пользователя/пароль (логин/пароль). Кроме того, XAuth в основном используется в качестве второго способа (метода) аутентификации после взаимной аутентификации с либо сертификатами либо PSK. С гибридной аутентификацией IKE-v1, таким образом, можно аутентифицировать шлюз при помощи сертификата и использовать только XAuth для аутентификации клиента.
При помощи IKE-v2 можно использовать несколько циклов (кругов) аутентификации, например, для первого круга аутентифируется «машина» при помощи сертификатов, а затем, вторым кругом, «пользователь» при помощи пары имя_пользователя/пароль (логин/пароль), основываясь на схеме проверки подлинности, например, EAP-MSCHAPv2. Кроме того, можно использовать асимметричную аутентификацию, например, путём проверки подлинности шлюза при помощи сертификата и клиента при помощи пары имя_пользователя/пароль (логин/пароль), взяв за основу EAP-метод (аутентификация в первом цикле).
Опять же, справочное руководство предоставляет десятки детальных примеров полной настройки под рассмотренные выше и подобные различные параметры аутентификации.
List Commands
ipsec leases ]
returns the status of all or the selected IP address pools (or even a single virtual IP address).
ipsec listaacerts
returns a list of X.509 Authorization Authority (AA) certificates that were loaded locally by the IKE daemon from the /etc/ipsec.d/aacerts directory. Implemented by calling the ipsec stroke listaacerts command.
ipsec listacerts
returns a list of X.509 Attribute certificates that were loaded locally by the IKE daemon from the /etc/ipsec.d/acerts directory. Implemented by calling the ipsec stroke listacerts command.
ipsec listalgs
returns a list of all supported IKE encryption and hash algorithms, and the available Diffie-Hellman groups. Implemented by calling the ipsec stroke listalgs command.
ipsec listcacerts
returns a list of X.509 Certification Authority (CA) certificates that were loaded locally by the IKE daemon from the /etc/ipsec.d/cacerts directory or received via the IKE protocol. Implemented by calling the ipsec stroke listcacerts command.
ipsec listcainfos
returns Certification Authority information (CRL distribution points, OCSP URIs, LDAP servers) that were defined by ca sections in ipsec.conf. Implemented by calling the ipsec stroke listcainfos command.
ipsec listcerts
returns a list of X.509 and/or OpenPGP certificates that were either loaded locally by the IKE daemon or received via the IKE protocol. Implemented by calling the ipsec stroke listcerts command.
ipsec listcounters
returns a list of global or connection specific counter values about received and sent IKE messages and rekeyings. Connection specific ounters are available since 5.0.3. Implemented by calling the ipsec stroke listcounters command.
ipsec listcrls
returns a list of Certificate Revocation Lists (CRLs) that were either loaded by the IKE daemon from the /etc/ipsec.d/crls directory or fetched from an HTTP- or LDAP-based CRL distribution point. Implemented by calling the ipsec stroke listcrls command. Note that X.509 Authority Key Identifier extension is used to associate CRL with a particular CA, otherwise CRL is listed but not applied.
ipsec listgroups
returns a list of all groups that are used to define user authorization profiles. Currently not supported.
ipsec listocsp
returns cached revocation information fetched from OCSP servers. Implemented by calling the ipsec stroke listocsp command.
ipsec listocspcerts
returns a list of X.509 OCSP Signer certificates that were either loaded locally by the IKE daemon from the /etc/ipsec.d/ocspcerts directory or were sent by an OCSP server. Implemented by calling the ipsec stroke listocspcerts command.
ipsec listplugins
returns a list of all loaded plugin features. Implemented by calling the ipsec stroke listplugins command.
ipsec listpubkeys
returns a list of public keys that were loaded in raw key format. Implemented by calling the ipsec stroke listpubkeys command.
ipsec listall
returns all information generated by the list commands above. Each list command can be called with the option which displays all dates in UTC instead of local time. Implemented by calling the ipsec stroke listall command.
The key size of the AES_GCM and AES_CCM algorithms no longer include salt/ICV values
With libreswan it is no longer requires (or allowed!) to specify the salt or ICV bytes for phase2 (using esp= or phase2alg=). The AES_GCM and AES_CCM algorithms come in different truncation flavours denoted with «_a», «_b» or «_c», for example «aes_gcm_c». While libreswan still supports this syntax, the non-flavoured version without underscore always refers to the strongest (_c) versions, and use of the other versions is discouraged and should only be done if required for interoperability with a remote peer. Note that similar rules apply to using AES_GCM or AES_CCM with IKE (using ike=) which openswan does not support at all. One difference is that the second component, which is always null for ESP, refers to the PRF function in IKE. Specifying null as PRF is invalid. SHA2 is often used in this combination (eg ike=aes_gcm-sha2). See the ipsec.conf man page for more details.
The following example list the libreswan specification versus the old openswan specification for ESP using AES_GCM with 16 byte ICV and 8 byte salt:
    # Libreswan AES_GCM
    esp=aes_gcm256-null
    # Old openswan notiation: esp=aes_gcm_c-280-null
Libreswan added support for AES_GCM in IKEv2, which is specified as ike=aes_gcm256-sha2 (where sha2 refers to the prf, not the integ/auth algorithm). Openswan does not support AES_GCM in IKE.
Changes to connection parameter options
A lot of new functionality has been added to libreswan. Please see the man page for ipsec.conf for more details. This section only lists the obsoleted or renamed per-connection options. Using the old names still works and a warning is logged.
The modecfgwin1=, modecfgwins2= and loopback= options are obsoleted and ignored.
The dpdaction restart and restart_by_peer was folded into one option called restart that behaves like the old restart_by_peer.
The NAT-T keepalive packet sending behaviour was changed. See the ipsec.conf man page for both the global nat-keepalive= and the per-connection keep-alive= options. See also nat-ikev1-method=.
Some X.509 options were renamed: strictcrlpolicy= to crl-strict=, ocsp_trust_name= to ocsp-trustname=
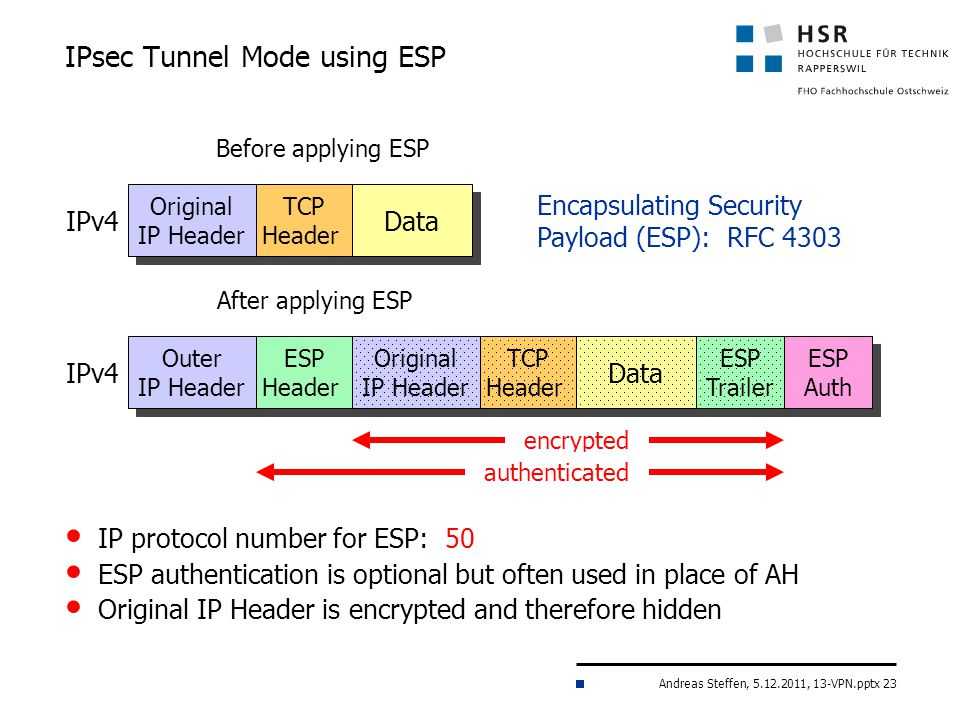
Режимы работы IPsec(транспортный, туннельный)
Существует два режима работы IPsec: транспортный режим и туннельный режим(когда в транспортном режиме работают только маршрутизаторы).
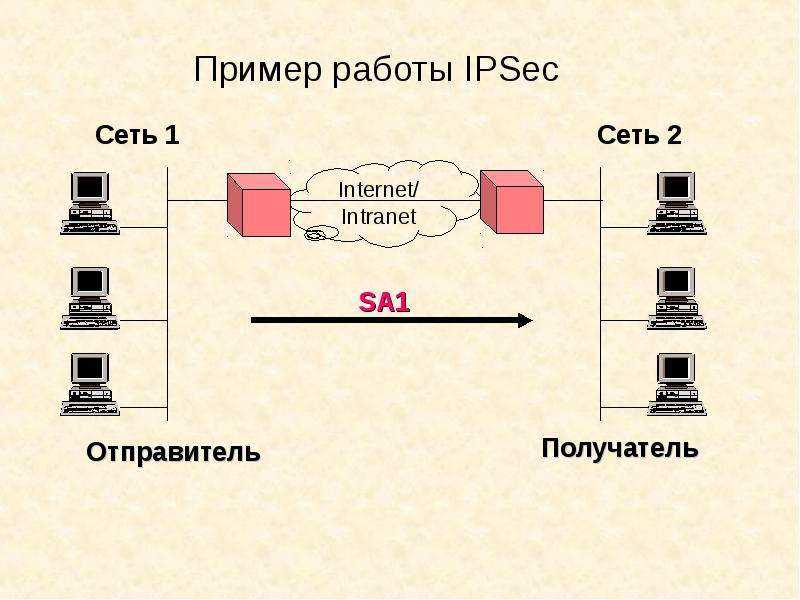
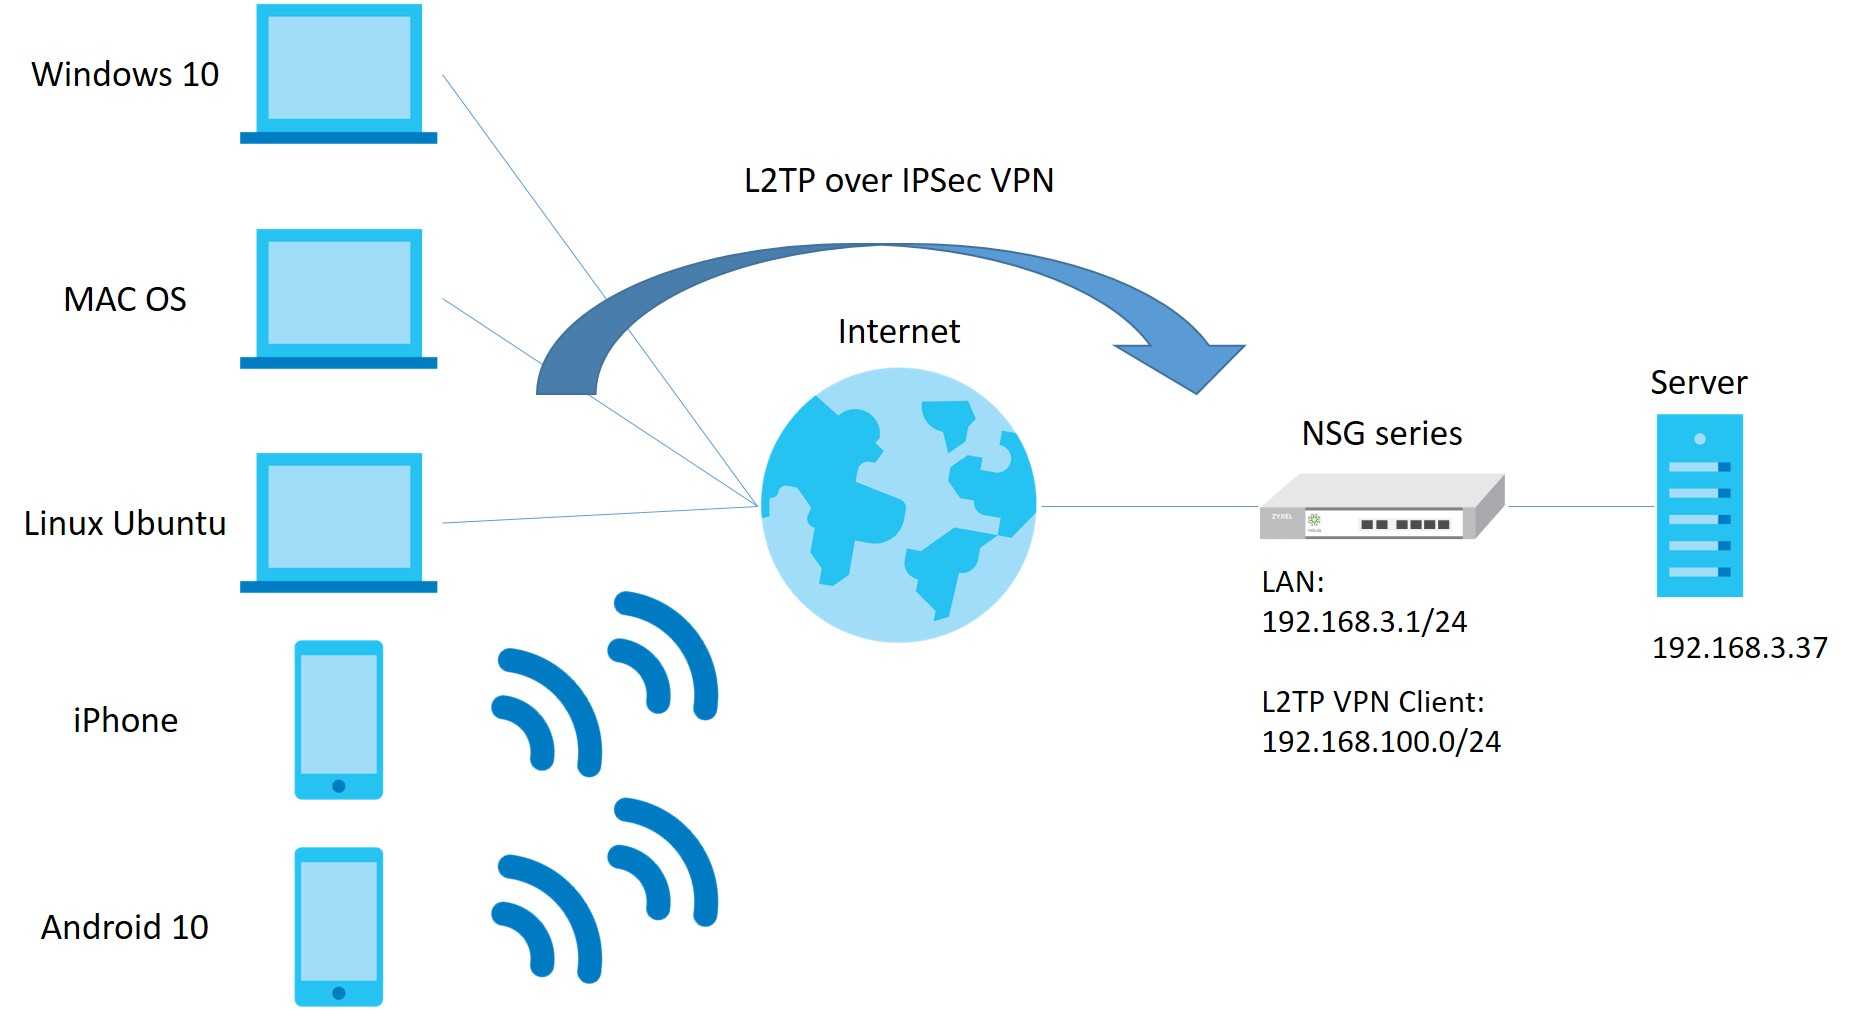
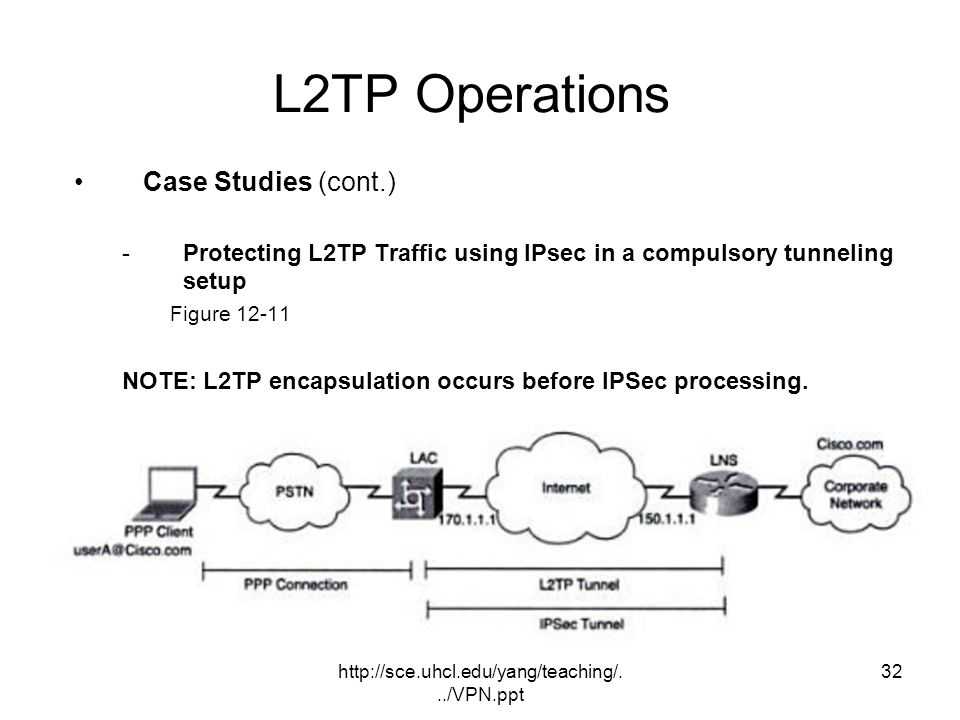
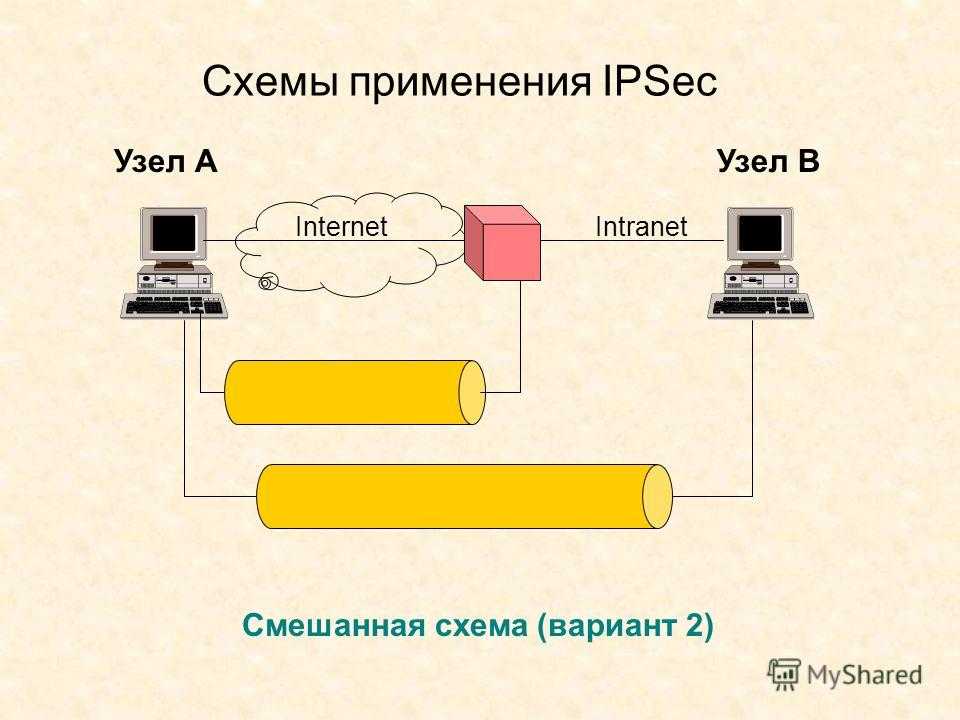
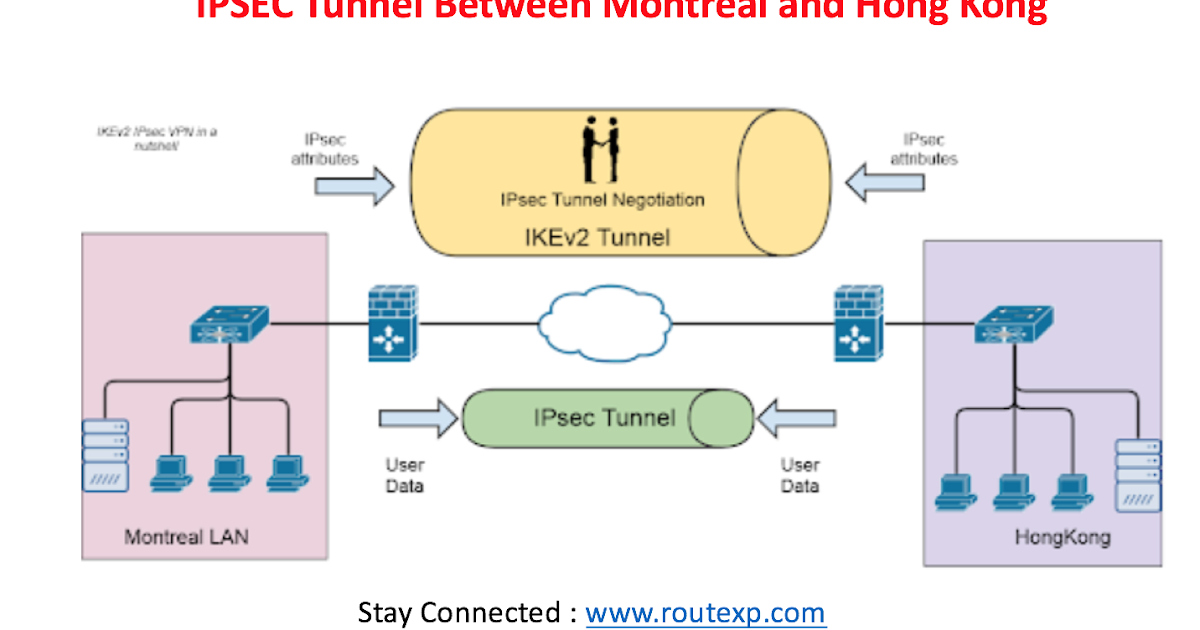
IPsec может быть использован или для непосредственного шифрования трафика между двумя хостами (транспортный режим); или для построения «виртуальных туннелей» между двумя подсетями, которые могут быть использованы для защиты соединений между двумя корпоративными сетями (туннельный режим). Туннельный режим обычно называют виртуальной частной сетью (Virtual Private Network, Что это такое VPN).
В транспортном режиме шифруется (или подписывается) только информативная часть IP-пакета. Маршрутизация не затрагивается, так как заголовок IP пакета не изменяется (не шифруется). Транспортный режим как правило используется для установления соединения между хостами. Он может также использоваться между шлюзами, для защиты туннелей, организованных каким-нибудь другим способом (IP tunnel, GRE туннели и др.).
| Транспортный режим | ||
|---|---|---|
| IP заголовок | ESP/AH заголовок | L4 payload |
В туннельном режиме IP-пакет шифруется целиком. Для того, чтобы его можно было передать по сети, он помещается в другой IP-пакет. По существу, это защищённый IP-туннель. Туннельный режим может использоваться для подключения удалённых компьютеров к виртуальной частной сети или для организации безопасной передачи данных через открытые каналы связи (например, Интернет) между шлюзами для объединения разных частей виртуальной частной сети. В туннельном режиме инкапсулируется весь исходный IP пакет, и добавляется новый IP заголовок.
| Туннельный режим | |||
|---|---|---|---|
| IP заголовок | ESP/AH заголовок | исходный IP заголовок | L4 payload |
Если используется IPsec совместно с GRE туннели, который инкапсулирует исходный пакет и добавляет новый IP заголовок, логично использовать транспортный режим.
Режимы IPsec не являются взаимоисключающими. На одном и том же узле некоторые SA могут использовать транспортный режим, а другие — туннельный.
Security Associations (SA). Для возможности проводить инкапсуляцию/декапсуляцию стороны участвующие в процессе обмена должны иметь возможность хранить секретные ключи, алгоритмы и IP адреса. Вся эта информация хранится в Ассоциациях Безопасности (SA), SA в свою очередь хранятся в Базе данных Ассоциаций Безопасности (SAD). , позволяет задать например mode transport | tunnel | ro | in_trigger | beet — режим безопасной ассоциации. Соответственно, может принимать одно из значений, означающих транспортный, тоннельный, beet (Bound End-to-End Tunnel), оптимизации маршрута (route optimization) или in_trigger режимы. (последние два используются в контексте mobile ipv6).
Security Policy (SP) — политика безопасности, хранится в SPD (База данных политик безопасности). SA специфицирует, как IPsec предполагает защищать трафик, SPD в свою очередь хранит дополнительную информацию, необходимую для определения какой именно трафик защищать и когда. SPD может указать для пакета данных одно из трёх действий: отбросить пакет, не обрабатывать пакет с помощью IPSec, обработать пакет с помощью IPSec. В последнем случае SPD также указывает, какой SA необходимо использовать (если, конечно, подходящий SA уже был создан) или указывает, с какими параметрами должен быть создан новый SA. SPD является очень гибким механизмом управления, который допускает очень хорошее управление обработкой каждого пакета. Пакеты классифицируются по большому числу полей, и SPD может проверять некоторые или все поля для того, чтобы определить соответствующее действие. Это может привести к тому, что весь трафик между двумя машинами будет передаваться при помощи одного SA, либо отдельные SA будут использоваться для каждого приложения, или даже для каждого TCP соединения.
Системные настройки
Убедитесь, что файрвол не содержит правил, а также установите пакет , который позволит подключать внешние репозитории:
Настройка ядра Linux
Готовый VPN будет использовать NAT для обработки интернет-трафика клиентов. Для корректной работы потребуется разблокировать пересылку пакетов и отключить ICP-редиректы. Убедитесь, что в файле присутствуют следующие параметры и им присвоены верные значения:
Конфигурация межсетевого экрана
Чтобы правила обработки подключений восстанавливались после перезагрузки, необходимо прописать все инструкции в файл (до строки ).
Должны приниматься подключения по протоколу UDP на портах 500 (для IKE) и 4500 (для NAT), а также по протоколу ESP — на всех:
Для корректной работы NAT потребуется еще пара инструкций:
В итоге файл должен выглядеть примерно так:
Сохраните изменения и перезагрузите сервер:
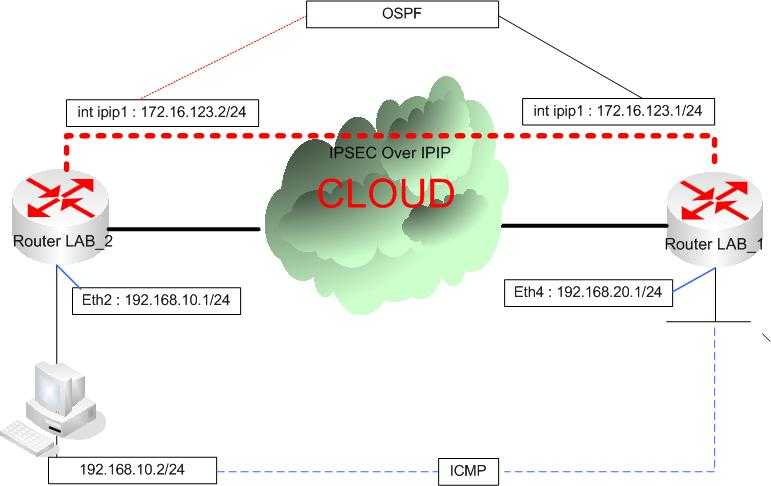
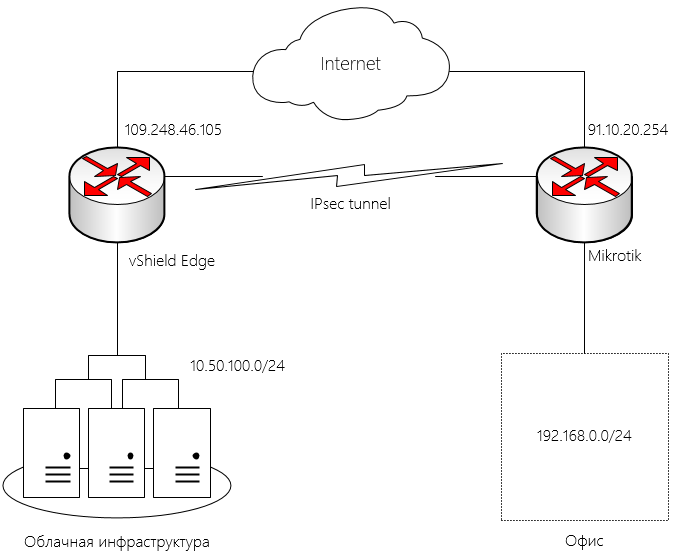
Сторона Б – ipsec.conf Конфигурационный файл
# cat /etc/ipsec.conf
---------------------------------------------
config setup
protostack=netkey
conn vpn

left=192.168.15.50
leftsubnet=10.12.50.0/24
right=192.168.15.5
rightsubnet=10.12.5.0/24
authby=secret
pfs=yes
rekey=yes
keyingtries=3
type=tunnel
auto=start
ike=aes256-sha1;modp2048
phase2alg=aes256-sha1
ipsec.secrets
192.168.15.5 192.168.15.50: PSK "12345678asdfghjk1qwe3wqA"
------------------------------------------
После изменений в конфигурационных файлах перезапустите ipsec на обеих сторонах
# ipsec restart
Сторона А:
![]()
Сторона Б:
![]()
Статус работы ipsec также можно посмотреть командой:
# setkey -D
![]()
Info Commands
ipsec version
returns the ipsec version in the form of Linux strongSwan U<strongSwan userland version>/K<Linux kernel version> if strongSwan uses the native NETKEY IPsec stack of the Linux kernel it is running on.
ipsec copyright
returns the copyright information.
ipsec —confdir
returns the SYSCONFDIR directory as defined by the configure options.
ipsec —directory
returns the LIBEXECDIR directory as defined by the configure options.
ipsec —help
returns the usage information for the ipsec command.
ipsec —versioncode
returns the ipsec version number in the form of U<strongSwan userland version>/K<Linux kernel version> if strongSwan uses the native NETKEY IPsec stack of the Linux kernel it is running on.
Настройка strongSwan
Корневой сертификат сервера положим в директорию /etc/ipsec.d/cacerts:
Установка корневого сертификата
sudo cp /path/to/ca-cert.pem /etc/ipsec.d/cacerts
Настроим файл конфигурации strongSwan /etc/ipsec.conf:
/etc/ipsec.conf
config setup

conn ikev2-rw
# измените адрес сервера на свой
    right=server.astradomain.ad
    rightid=@server.astradomain.ad

    rightsubnet=0.0.0.0/0
    rightauth=pubkey
    leftsourceip=%config
# имя пользователя для которого выдан сертификат
    leftid=user
    leftcert=%smartcard:45
    leftauth=eap
    eap_identity=%identity
    auto=start
Настроим файл паролей аутентфикации strongSwan /etc/ipsec.secrets и укажем, какой ключ нужно использовать для аутентификации по смарт-карте:
/etc/ipsec.secrets
# Формат следующий
#: PIN %smartcard:<keyid> <pin code>
: PIN %smartcard:45 "12345678"
Networking
You’re almost done setting up your server. There are a few things left to make
your VPN server properly route the VPN tunnel:
/etc/sysctl.d/10-net-forward.conf
# VPN
net.ipv4.ip_forward = 1
net.ipv4.conf.all.accept_redirects = 0
net.ipv4.conf.all.send_redirects = 0
The VPN configuration above automatically assigns an IP address to the client
using DHCP, so you need to have a working DHCP server. If the server is running
on the same host as strongSwan, you may need to edit
like this:
/etc/strongswan.d/charon/dhcp.conf
dhcp {
 force_server_address = yes
 server = 192.168.0.255
}
You may also need to allow the following protocols in your firewall:
- ESP (Encrypted Secure Payload): Standard IPSec traffic
- UDP 4500: IPSec traffic in «NAT Traversal» mode
- UDP 500: Key exchanges (IKE)
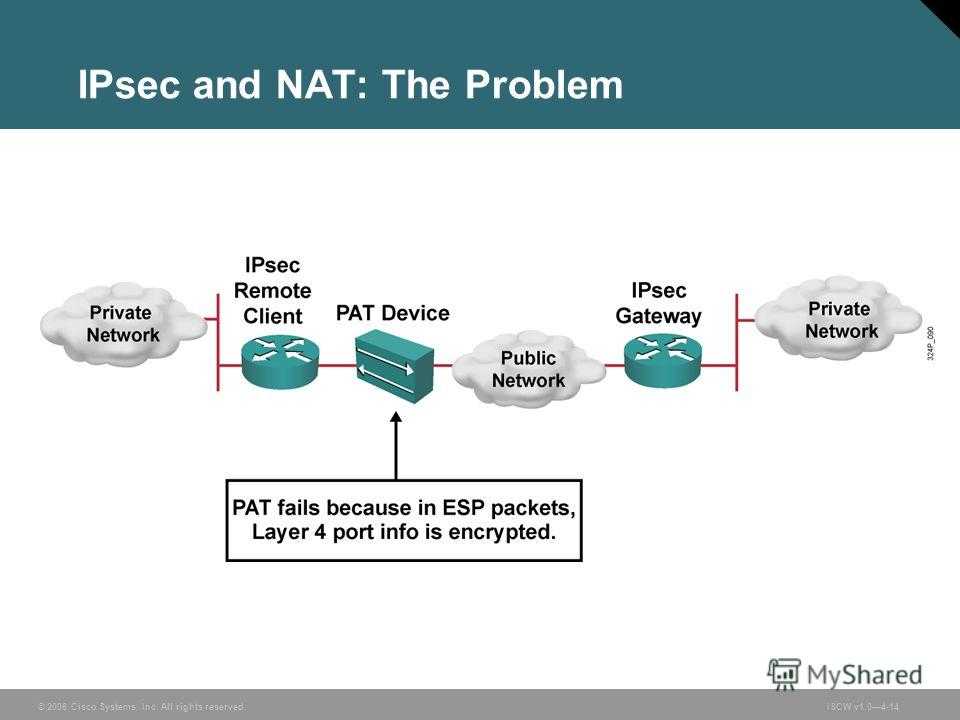
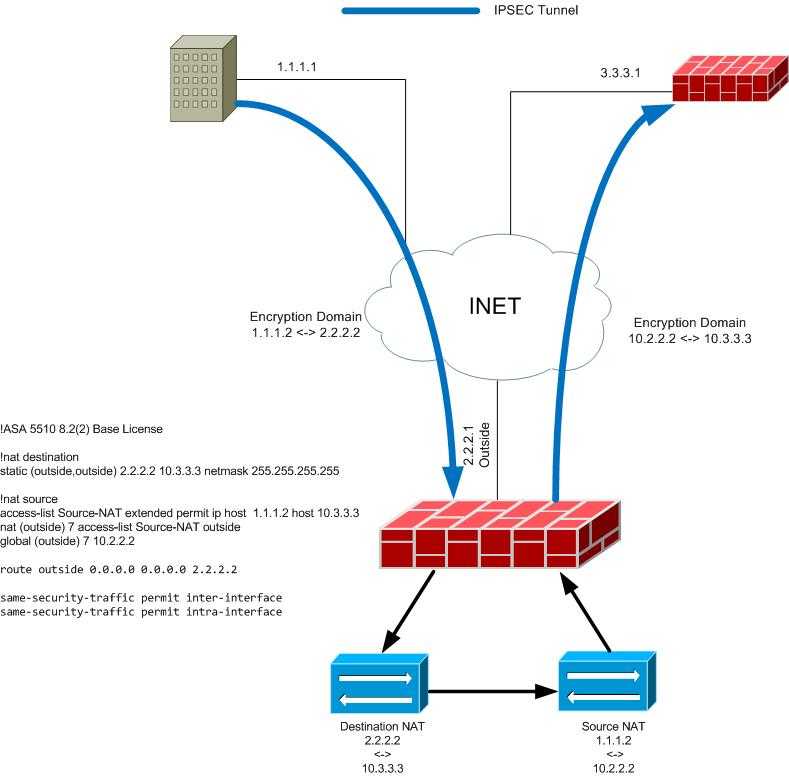
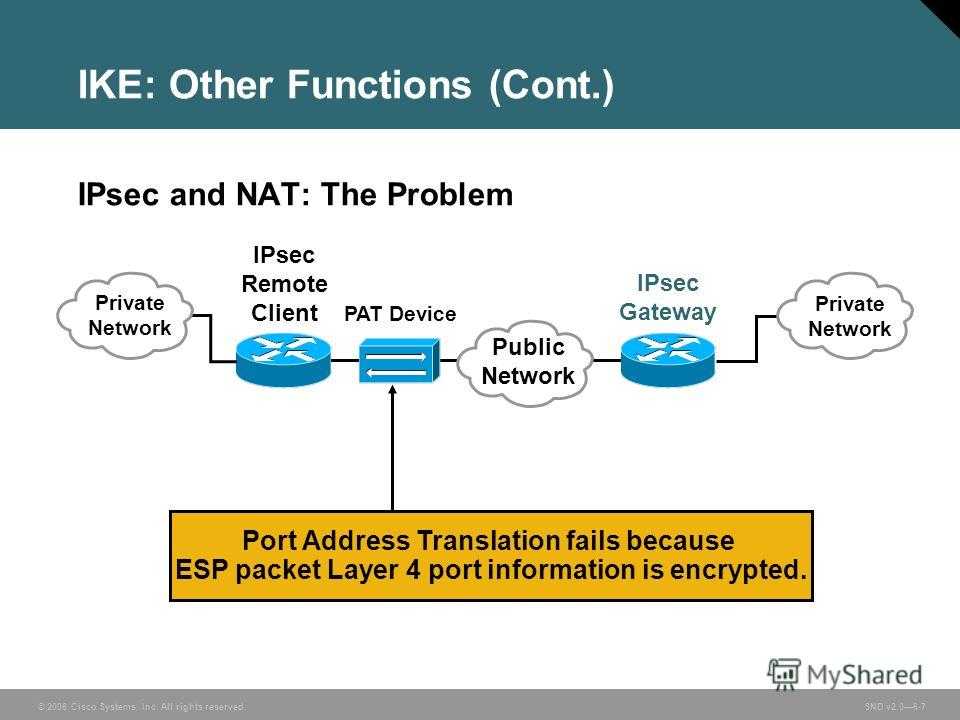
General NAT problems
Local firewall stacks generally don’t treat packets with a matching IPsec policy any different from unprotected packets. That means NAT rules also apply to traffic that is supposed to be tunneled.
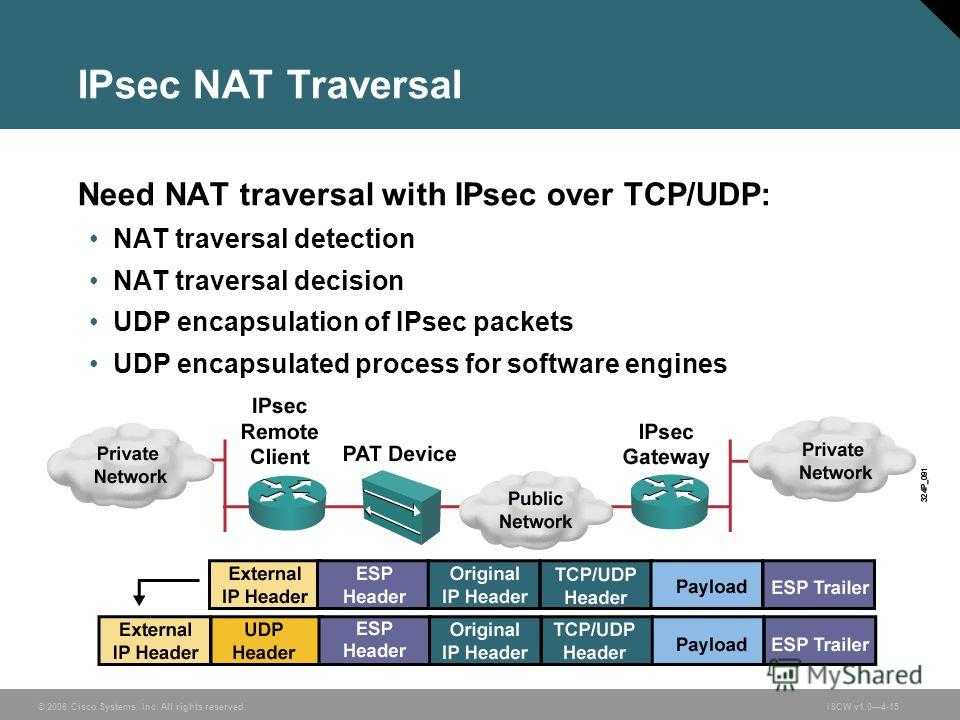
This often leads to problems, because many hosts have or rules set up, which change the source IP of the packetsmaking them not match the negotiated IPsec policies when IPsec processing of outgoing packets happens (In the graphic here that’s «xfrm lookup»).To fix this problem, packets with a matching IPsec policy should skip NAT rules in the chain of the table.This is achieved by inserting a rule that accepts packets with a matching IPsec policy before any NAT rule in the chain.
The following rule does that:
iptables -t nat -I POSTROUTING -m policy --pol ipsec --dir out -j ACCEPT
Split-Tunneling
With split-tunneling the clients will only send traffic for specific destination subnets to the gateway. For both protocol versionssplit-tunneling is easy to deploy if traffic selectors (TS) can freely be configured on both peers. In that case you’d simply usespecific values for the rightsubnet and leftsubnet options.
Split-Tunneling with IKEv2
With IKEv2 split-tunneling is quite easy to use as the protocol inherently supports narrowing of the proposed traffic selectors.
For instance, if the client proposes 0.0.0.0/0 as remote TS (rightsubnet), this can be narrowed on the gateway by configuringleftsubnet=<list of subnets>. Likewise, the client may already propose a selective remote TS by configuring a list of subnetswith rightsubnet, which the gateway might simply accept (e.g. if it has leftsubnet=0.0.0.0/0 configured) or could again narrowto a subset.
While the protocol supports split-tunneling, whether it can actually be used depends on the client. Most remote access clientswill propose 0.0.0.0/0 as remote TS, so split-tunneling must be configured on the gateway. But whether this will actually resultin split-tunneling will depend on the client. All strongSwan based clients (Linux, NetworkManager, Android) support this kind ofnarrowing, for Windows 7 clients the situation is as follows.
The Windows 7 client will always allow access to the host’s LAN. So to access, for instance, a local printer nothing specialhas to be done. Since the client always proposes 0.0.0.0/0 as remote TS, the gateway is free to narrow it to a subset. But tomake split-tunneling actually work on the client the Use default gateway on remote network option in the Advanced TCP/IP settings ofthe VPN connection has to be disabled. Also, because a classful route is installed the virtual IP address has to belong to theremote subnet, otherwise, the Disable class based route addition option has to be enabled and routes have to be installedmanually.
With Windows 8.1 (and in Windows Server 2012 R2) Microsoft introduced PowerShell cmdlets to configure VPN connections.These provide more options and also allow to configure split tunneling directly (-SplitTunneling option).
Windows 10 has split tunneling enabled by default, but with the same limitations seen since Windows 7, i.e. the virtual IP has to befrom the remote subnet, or routes have to be added manually, for instance, via Add-VpnConnectionRoute PowerShell command.To tunnel all traffic via VPN instead, split tunneling has to be disabled explicitly, either by enabling the Use default gateway on remote networksetting described above or by using the following PowerShell command:
Split-Tunneling with IKEv1
IKEv1 does not provide narrowing of traffic selectors by default. That means that the traffic selector configuration usually hasto match exactly on both peers. To simplify things, the IKEv1 implementation in the charon daemon (available since 5.0.0)does support narrowing of traffic selectors similar to how it is implemented for IKEv2. Unfortunately, this is not compatiblewith many implementations by other vendors.
On the other hand, such clients may support the Unity extensions developed by Cisco. Since 5.0.1 the unity plugin providesstrongSwan gateways with a transparent way of assigning narrowed traffic selectors to clients that support these extensions (e.g.racoon, as used in Apple products). For earlier releases the attr-sql plugin provides the means to manually configure attributesthat enable split-tunneling for Unity-aware clients (since 5.0.1 such attributes can also be provided through the attr plugin).
Приготовления
Определитесь с местоположением сервера. В общем случае берите тот, что географически ближе. Если же VPN нужен для использования конкретного сервиса (например, Netflix) — заводите сервер в одной с ним стране.
Для собственного VPN я зарегистрировал домен goldfinch.im; сам с собой договорился, что буду поддерживать несколько серверов (по количеству нужных мне стран). Завел поддомен для одного из них.
После создал сервер с Ubuntu 16.04 LTS. Получил IP-адрес , который использовал для сопоставления в DNS. Настроил почту для домена и завел ящик .
Нам нужна виртуальная частная сеть с адресацией , внутри которой, в качестве DNS-сервера, будет использоваться гугловый (в реальной жизни решение так себе, но для примера сойдет).
Подключаться будем по логину и аналогичному паролю.
При использовании приведенного далее кода, заменяйте значения, упомянутые в этом блоке руководства, на собственные.


