
Удаление завершенного процесса из таблицы процессов
После завершения процесса его остается занят — это состояние процесса называется «зомби». Чтобы освободить родительский процесс должен дождаться завершения дочернего и очистить таблицу процессов. Это достигается вызовом:
Вызов эквивалентен
ждет завершения дочернего процесса и возвращает его . Код завершения и обстоятельства завершения заносятся в переменную status. Дополнительно, поведением можно управлять через параметр options.
- pid < -1 — ожидание завершения дочернего процесса из группы с pgid==-pid
- pid == -1 — ожидание завершения любого дочернего процесса
- pid == 0 — ожидание завершения дочернего процесса из группы, pgid которой совпадает с pgid текущего процесса
- pid > 0 — ожидание завершения любого дочернего процесса с указанным pid
Опция WNOHANG — означает неблокирующую проверку завершившихся дочерних процессов.
Статус завершения проверяется макросами:
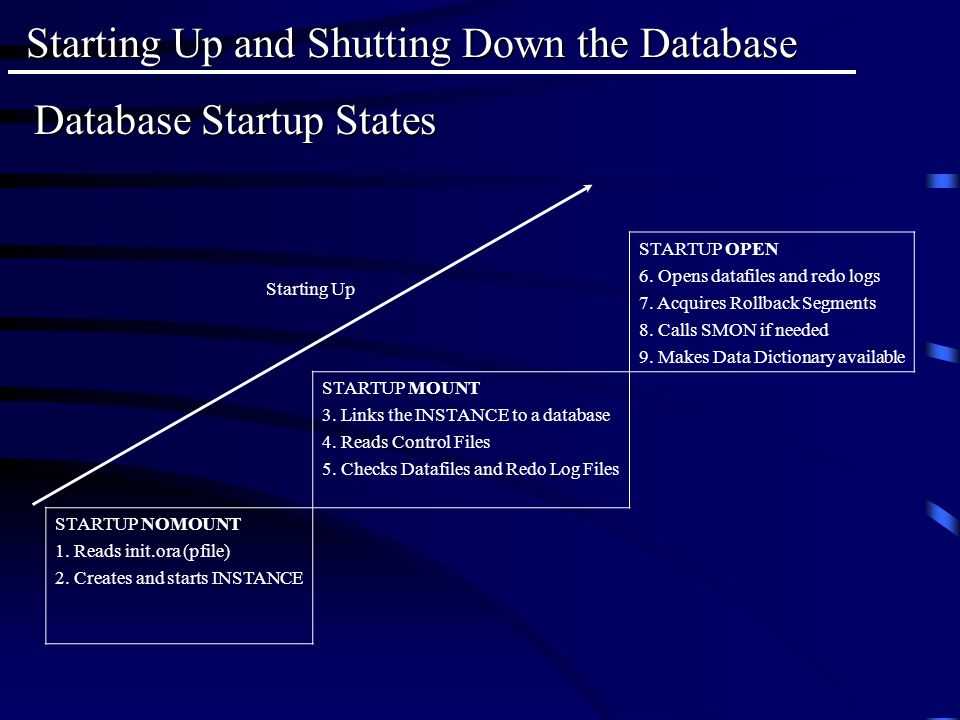
Уровни выполнения
В Linux существует такое понятие как уровень выполнения (run level). Уровень выполнения обозначается числами от 0 до 6.
Система в определенный момент времени находится на соответствующем уровне выполнения. Вы, как администратор системы можете переводить ее с одного уровня выполнения на другой. Это делается при помощи программы init (или telinit). Для этого программе в качестве аргумента передается число соответствующее уровню выполнения. Например, что бы перевести систему на 3-й уровень выполнения, необходимо запустить init следующим образом:
init 3
В различных дистрибутивах Linux уровни выполнения используются для различных целей.
Современная версия программы init может использовать десять уровней выполнения, но обычно используются только семь.
0 — выполняются действия по выключению системы.
1 — однопользовательский режим (single user mode). Предназначен для различных административных действий по восстановлению системы. По своему смыслу аналогичен Safe Mode Windows, но полностью его не повторяет. На этом уровне выполнения система полностью сконфигурирована, но не запущен ни один сервис, а из пользователей может работать только один root.
2 — не используется, но сконфигурирован как уровень выполнения 3. В RedHat и SuSE Linux, сконфигурирован, как уровень выполнения 3, но без поддержки сетевых файловых систем. В Debian используется как многопользовательский режим.
3 — многопользовательский режим (multiuser mode). Нормальный режим работы сервера.
4 — В Slackware Linux используется для графического входа в систему. В RedHat и SuSE Linux не сконфигурирован.
- 5 — В RedHat и SuSE Linux используется для графического входа в систему. В Slackware Linux не сконфигурирован.
- 6 — выполняются действия по перезагрузке системы.
Суперпользователь может остановить систему, переведя её на нулевой уровень:
init 0
Или перегрузить систему:
init 6
Description
The shutdown command brings the system down in a secure way. All logged-in users are notified that the system is going down, and login operations are blocked. It is possible to shut the system down immediately, or after a specified delay.
All processes are first notified that the system is going down by the signal SIGTERM. This gives programs like vi time to save the file being edited, mail and news processing programs a chance to exit cleanly, etc.
shutdown does its job by signalling the init process, asking it to change the runlevel. Runlevel 0 is used to halt the system, runlevel 6 is used to reboot the system, and runlevel 1 is used to put the system into a state where administrative tasks can be performed (single-user mode). Runlevel 1 is the default, unless the -h or -r options are specified.
Your system may have a different set of options for the shutdown command; check your documentation for details.
Adjusting the System State (Runlevel) with Targets
Targets are special unit files that describe a system state or synchronization point. Like other units, the files that define targets can be identified by their suffix, which in this case is . Targets do not do much themselves, but are instead used to group other units together.
This can be used in order to bring the system to certain states, much like other init systems use runlevels. They are used as a reference for when certain functions are available, allowing you to specify the desired state instead of the individual units needed to produce that state.
For instance, there is a that is used to indicate that swap is ready for use. Units that are part of this process can sync with this target by indicating in their configuration that they are or the . Units that require swap to be available can specify this condition using the , , and specifications to indicate the nature of their relationship.
Getting and Setting the Default Target
The process has a default target that it uses when booting the system. Satisfying the cascade of dependencies from that single target will bring the system into the desired state. To find the default target for your system, type:
If you wish to set a different default target, you can use the . For instance, if you have a graphical desktop installed and you wish for the system to boot into that by default, you can change your default target accordingly:
Listing Available Targets
You can get a list of the available targets on your system by typing:
Unlike runlevels, multiple targets can be active at one time. An active target indicates that has attempted to start all of the units tied to the target and has not tried to tear them down again. To see all of the active targets, type:
Isolating Targets
It is possible to start all of the units associated with a target and stop all units that are not part of the dependency tree. The command that we need to do this is called, appropriately, . This is similar to changing the runlevel in other init systems.
For instance, if you are operating in a graphical environment with active, you can shut down the graphical system and put the system into a multi-user command line state by isolating the . Since depends on but not the other way around, all of the graphical units will be stopped.
You may wish to take a look at the dependencies of the target you are isolating before performing this procedure to ensure that you are not stopping vital services:
When you are satisfied with the units that will be kept alive, you can isolate the target by typing:
Using Shortcuts for Important Events
There are targets defined for important events like powering off or rebooting. However, also has some shortcuts that add a bit of additional functionality.
For instance, to put the system into rescue (single-user) mode, you can just use the command instead of :
This will provide the additional functionality of alerting all logged in users about the event.
To halt the system, you can use the command:
To initiate a full shutdown, you can use the command:
A restart can be started with the command:
These all alert logged in users that the event is occurring, something that only running or isolating the target will not do. Note that most machines will link the shorter, more conventional commands for these operations so that they work properly with .
For example, to reboot the system, you can usually type:
Security
init uses for session management. The PAM configuration policy, configured in
either /etc/pam.conf or per-service files in /etc/pam.d/, specifies the session management module to
be used for init. Here is a partial pam.conf file with entries
for init using the UNIX session management module.


init session required pam_unix_session.so.1
The equivalent PAM configuration using /etc/pam.d/ would be the following entry in
/etc/pam.d/init:
session required pam_unix_session.so.1
If there are no entries for the init service in /etc/pam.conf and
no /etc/pam.d/init file exists, then the entries for the “other” service in
/etc/pam.conf will be used. If there are not any entries in /etc/pam.conf
for the “other” service, then the entries in /etc/pam.d/other will be used.
How to Boot a System to a Multiuser State (Run Level 3)
Use this procedure to boot a system that is currently at run
level 0 to run level 3. Any information in this procedure that applies
to either the SPARC or x86 platforms is noted accordingly.
-
Assume the root role.
See .
-
Depending on the platform, do one of the following:
-
For SPARC platforms:
-
Bring the system to the ok PROM prompt.
# init 0
-
Boot the system to run level 3.
ok boot
-
Bring the system to the ok PROM prompt.
-
For x86 platforms, reboot the system to run level 3.
# reboot
The boot process displays a series of startup messages and brings the system
to run level 3. For more information, see the and
man pages.
-
For SPARC platforms:
-
Verify that the system has booted to run level 3.
The login prompt is displayed when the boot process has finished successfully.
hostname console login:
Example 4-4 SPARC: Booting a System to a Multiuser State (Run Level 3)
The following example shows the messages from booting a SPARC based system to
run level 3 after the boot process has started.
ok boot
Probing system devices
Probing memory
ChassisSerialNumber FN62030249
Probing I/O buses

.
.
.
.
OpenBoot 4.30.4.a, 8192 MB memory installed, Serial #51944031.
Ethernet address 0:3:ba:18:9a:5f, Host ID: 83189a5f.
Rebooting with command: boot
Boot device: /pci@1c,600000/scsi@2/disk@0,0:a  File and args:
SunOS Release 5.11 Version 11.1 64-bit
Copyright (c) 1983, 2011, Oracle and/or its affiliates. All rights reserved.
misc/forthdebug (455673 bytes) loaded
Hardware watchdog enabled
Hostname: portia-123
NIS domain name is solaris.example.com

portia-123 console login: NIS domain name is solaris.example.com
Example 4-5 x86: Booting a System to a Multiuser State (Run Level 3)
The following example shows the messages when booting an x86 based system to
run level 3 after the boot process has started. Because the Fast
Reboot feature is the default in this release (on x86 platforms), booting the
system with the reboot command initiates a fast reboot of the system, meaning the
BIOS or UEFI firmware is bypassed. Also, the GRUB menu is not displayed
during the system boot. If you need to access the system’s firmware or
edit the GRUB menu at boot time, use the reboot command with the
-p option. See .
~# reboot
Apr 23 13:30:29 system-04 reboot: initiated by ... on /dev/console
Terminated
system-04% updating /platform/i86pc/boot_archive
updating /platform/i86pc/amd64/boot_archive

system-04 console login: syncing file systems... done
SunOS Release 5.11 Version 11.1 64-bit
Copyright (c) 1983, 2012, Oracle and/or its affiliates. All rights reserved.
Hostname: system-04

system-04 console login: <username>
Password: xxxxxx
Last login: Mon Apr 23 11:06:05 on console
Oracle Corporation      SunOS 5.11      11.1    April 2012
# who -r
        run-level 3  Apr 23 13:31     3      0  S
Notes
init and telinit can be run only by a privileged user.
The S or s state must not be used indiscriminately in /etc/inittab.
When modifying this file, it is best to avoid adding this state
to any line other than initdefault.
If a default state is not specified in the initdefault entry in
/etc/inittab, state 6 is entered. Consequently, the system will loop by going
to firmware and rebooting continuously.
If the utmpx file cannot be created when booting the system, the
system will boot to state “s” regardless of the state specified in
the initdefault entry in /etc/inittab. This can occur if the /var file system
is not accessible.
When a system transitions down to the S or s state, the
/etc/nologin file (see ) is created. Upon subsequent transition to run level 2,
this file is removed.
init uses /var/run/initpipe, a named pipe, for internal communication.
The pam_unix(5) module is no longer supported. Similar functionality is provided by
.
Спор вокруг систем инициализации в Linux
System V init (или просто «SysV») — это система инициализации, которая существует со времен операционной системы System V, которая была выпущена в 1983 году. SysV оставалась системой инициализации в течение почти трех десятилетий (за некоторыми исключениями). Многие IT-специалисты и программисты в силу своей привычки не хотели отказываться от SysV, да и к тому же она была очень простой для понимания.
Проблема с SysV заключалась в том, что в её основе лежали концепции, существовавшие много лет назад. SysV не хватало возможности нативно обрабатывать многие вещи, такие как: обнаружение съемных носителей, корректное обнаружение аппаратного обеспечения и загрузка встроенного ПО, загрузка различных модулей и пр. Кроме того, при использовании данной системы, инициализация процессов происходит последовательно, т.е. одна задача запускается только после успешного завершения предыдущей. Часто это приводило к задержке и длительному времени загрузки. Задачи, подобные монтированию файловых систем, выполняются один раз во время загрузки, после чего «забываются». Но такого подхода недостаточно для автоматизированного управления сервисами, требующими к себе постоянного внимания.
В попытке привнести больше возможностей в процесс инициализации Linux-систем, компания Canonical в 2006 году вместе с релизом Ubuntu 6.10 (Edgy Eft) выпускает систему инициализации Upstart, которая с самого начала разрабатывалась с учетом обратной совместимости. Она может запускать демоны без каких-либо изменений в их скриптах запуска.
Другой системой инициализации, восходящей своими корнями к операционной системе 4.4BSD, является rc.init. Она применяется в таких дистрибутивах, как: FreeBSD, NetBSD и Slackware. В 2007 году разработчики Gentoo выпустили улучшенный вариант данной системы инициализации, сделав её модульной и назвав OpenRC. Большинство других дистрибутивов Linux исторически продолжало использовать SysV.
В 2010 году инженеры компании Red Hat Леннарт Пёттеринг и Кей Сиверс приступили к разработке новой системы инициализации — systemd, которая разрабатывалась с учетом недостатков, имеющихся в SysV. В состав systemd, помимо прочего, также входят и различные пакеты, утилиты и библиотеки, позволяющие производить параллельный запуск процессов, сокращая тем самым время загрузки системы и количество необходимых вычислений. Весной того же года Fedora 15 стала первым дистрибутивом, в котором по умолчанию использовалась система инициализации systemd. После чего, на протяжении следующих трех лет, большинство дистрибутивов массово перешли на systemd.
Но, если все остальные дистрибутивы отдают предпочтение systemd и считают её лучшей системой инициализации, как для предприятий, так и для любителей, почему так много споров вокруг нее?
systemd, по сравнению с SysV и Upstart, содержит большое количество различных улучшений, а также предлагает и другие компоненты, имеющие более тесную интеграцию с системой, с помощью которых разработчики могут уменьшить объем выполняемой работы. Что в этом плохого? Ну, поскольку разработчики создают программное обеспечение, которое зависит от systemd и/или от любой из её многочисленных служб (journald, udevd, consoled, logind или networkd), то такое ПО становится менее совместимым с системами, в которых systemd не применяется. По мере того, как количество служб, предоставляемых проектом systemd, продолжает расти, systemd сама становится все более зависимой от них.
В результате systemd становится самостоятельной платформой, и её повсеместное распространение непреднамеренно препятствует разработке программного обеспечения, которое является переносимым и совместимым с операционными системами, не поддерживающими systemd. Но действительно ли всё так печально? Конечно, нет. Прежде всего, это проект с открытым исходным кодом, и у людей есть выбор: использовать его или нет. Пользователи и разработчики могут извлечь выгоду из наличия нескольких конкурирующих систем инициализации, и нет вины systemd в том, что основные дистрибутивы переключились на нее из-за её плюсов.
Создание процессов fork()
Новые процессы создаются вызовом , который создаёт точную копию вызвавшего его процесса. Пара процессов называются «родительский» и «дочерний» и отличаются друг от друга тремя значениями:
- уникальный идентификатор процесса PID
- идентификатор родительского процесса PPID
- значение, возвращаемое вызовом . В родительском это PID дочернего процесса или ошибка (-1), в дочернем всегда возвращает 0.
После создания, дочерний процесс может загрузить в свою память новую программу (код и данные) из исполняемого файла вызовом
Дочерний процесс связан с родительским значением PPID. В случае завершения родительского процесса PPID меняется на особое значение 1 — PID процесса init.
Тестирование
![]()
Переходим к тестированию. Опять же, как это делается?
С помощью командного файла test.cmd можно быстро запускать тесты.
Командный файл test.cmd
![]()
Внутри, если посмотреть, командный файл test.cmd выглядит очень просто – используется команда:
эта команда позволяет быстро прогнать фичи.
Можно дополнить этот командный файл модульным или дымовым тестированием, добавив команду:
но дымовое тестирование выполняется достаточно долго, поэтому сейчас делаем просто быстрое тестирование через BDD-тесты (инструмент Vanessa-ADD) или через модульные тесты (также инструмент Vanessa-ADD).
Unit Management
So far, we have been working with services and displaying information about the unit and unit files that knows about. However, we can find out more specific information about units using some additional commands.
Displaying a Unit File
To display the unit file that has loaded into its system, you can use the command (this was added in version 209). For instance, to see the unit file of the scheduling daemon, we could type:
The output is the unit file as known to the currently running process. This can be important if you have modified unit files recently or if you are overriding certain options in a unit file fragment (we will cover this later).


![Программа init [rtfm.wiki]](https://fuzeservers.ru/wp-content/uploads/5/5/3/553c60e02df1af651af9422279f56734.jpeg)


Displaying Dependencies
To see a unit’s dependency tree, you can use the command:
This will display a hierarchy mapping the dependencies that must be dealt with in order to start the unit in question. Dependencies, in this context, include those units that are either required by or wanted by the units above it.
The recursive dependencies are only displayed for units, which indicate system states. To recursively list all dependencies, include the flag.
To show reverse dependencies (units that depend on the specified unit), you can add the flag to the command. Other flags that are useful are the and flags, which can be used to show units that depend on the specified unit starting before and after themselves, respectively.
Checking Unit Properties
To see the low-level properties of a unit, you can use the command. This will display a list of properties that are set for the specified unit using a format:
If you want to display a single property, you can pass the flag with the property name. For instance, to see the conflicts that the unit has, you can type:
Masking and Unmasking Units
We saw in the service management section how to stop or disable a service, but also has the ability to mark a unit as completely unstartable, automatically or manually, by linking it to . This is called masking the unit, and is possible with the command:
This will prevent the Nginx service from being started, automatically or manually, for as long as it is masked.
If you check the , you will see the service is now listed as masked:
If you attempt to start the service, you will see a message like this:
To unmask a unit, making it available for use again, use the command:
This will return the unit to its previous state, allowing it to be started or enabled.
How to Shut Down a Server
-
Become superuser or assume an equivalent role.
Roles contain authorizations and privileged commands. For more information about roles, see .
-
Find out if users are logged in to the system.
# who
A list of all logged-in users is displayed. You might want to
send mail or broadcast a message to let users know that the system
is being shut down. -
Shut down the system.
# shutdown -iinit-level -ggrace-period -y
- -iinit-level
-
Brings the system to an init level that is different from the default of S. The choices are 0, 1, 2, 5, and 6.
Run levels 0 and 5 are reserved states for shutting the system down. Run level 6 reboots the system. Run level 2 is available as a multi-user operating state.
- -ggrace-period
-
Indicates a time (in seconds) before the system is shut down. The default is 60 seconds.
- -y
-
Continues to shut down the system without intervention. Otherwise, you are prompted to continue the shutdown process after 60 seconds.
For more information, see the man page.
-
If you are asked for confirmation, type y.
Do you want to continue? (y or n): y
If you used the shutdown -y command, you will not be prompted to continue.
-
Type the superuser password, if prompted.
Type Ctrl-d to proceed with normal startup,
(or give root password for system maintenance): xxxxxx
-
After you have finished the system administration tasks, press Control-D to return to
the default system run level. -
Use the following table to verify that the system is at the run
level that you specified in the shutdown command.Specified Run Level SPARC Based System
Promptx86 Based System Prompt S (single-user level) # # 0 (power-down level) ok or > Press any key to reboot Run level 3
(multiuser level with remote resources shared)hostname console login: hostname console login:
Example 10-2 SPARC: Bringing a Server to Run Level S
In the following example, the shutdown command is used to bring a SPARC
based system to run level S (single-user level) in three minutes.
# who
root   console      Jun 14 15:49    (:0)

# shutdown -g180 -y

Shutdown started.    Mon Jun 14 15:46:16 MDT 2004

Broadcast Message from root (pts/4) on venus Mon Jun 14 15:46:16...
The system venus will be shut down in 3 minutes .
.
.
Broadcast Message from root (pts/4) on venus Mon Jun 14 15:46:16...
The system venus will be shut down in 30 seconds .
.
.
INIT: New run level: S
The system is coming down for administration.  Please wait.
Unmounting remote filesystems: /vol nfs done.
Shutting down Solaris Management Console server on port 898.
Print services stopped.
Jun 14 15:49:00 venus syslogd: going down on signal 15
Killing user processes: done.

Requesting System Maintenance Mode
SINGLE USER MODE

Root password for system maintenance (control-d to bypass): xxxxxx
single-user privilege assigned to /dev/console.
Entering System Maintenance Mode
#
Example 10-3 SPARC: Bringing a Server to Run Level 0
In the following example, the shutdown command is used to bring a SPARC
based system to run level 0 in 5 minutes without requiring additional confirmation.
# who
root       console       Jun 17 12:39
userabc         pts/4        Jun 17 12:39   (:0.0)
# shutdown -i0 -g300 -y
Shutdown started.    Thu Jun 17 12:40:25 MST 2004

Broadcast Message from root (console) on pretend Thu Jun 17 12:40:25...
The system pretend will be shut down in 5 minutes
.
.
.
Changing to init state 0 - please wait
#
INIT: New run level: 0
The system is coming down.  Please wait.
System services are now being stopped.
.
.
.
The system is down.
syncing file systems... done
Program terminated
Type  help  for more information
ok
If you are bringing the system to run level 0 to turn
off power to all devices, see .
Example 10-4 SPARC: Rebooting a Server to Run Level 3
In the following example, the shutdown command is used to reboot a SPARC
based system to run level 3 in two minutes. No additional confirmation is
required.
# who
root           console      Jun 14 15:49    (:0)
userabc    pts/4        Jun 14 15:46    (:0.0)
# shutdown -i6 -g120 -y
Shutdown started.    Mon Jun 14 15:46:16 MDT 2004

Broadcast Message from root (pts/4) on venus Mon Jun 14 15:46:16...
The system venus will be shut down in 2 minutes


Changing to init state 6 - please wait
#
INIT: New run level: 6
The system is coming down.  Please wait.
.
.
.
The system is down.
syncing file systems... done
rebooting...
.
.
.
venus console login:
See Also
Regardless of why you shut down a system, you will probably want
to return to run level 3, where all file resources are available, and
users can log in. For instructions on bringing a system back to a
multiuser level, see .
Конструктор классов с наследованием
class Person:

    def __init__(self, n):
        print('Person Constructor')
        self.name = n


class Employee(Person):

    def __init__(self, i, n):
        print('Employee Constructor')
        super().__init__(n)  # same as Person.__init__(self, n)
        self.id = i


emp = Employee(99, 'Pankaj')
print(f'Employee ID is {emp.id} and Name is {emp.name}')
Выход:
Employee Constructor
Person Constructor
Employee ID is 99 and Name is Pankaj
- Мы обязаны вызвать конструктор суперкласса.
- Мы можем использовать функцию super() для вызова функции конструктора суперкласса.
- Мы также можем использовать имя суперкласса для вызова его метода init().
Настройка Git
![]()
Теперь можно перейти к внедрению.
Перед тем, как начать, важно подготовить окружение для разработки – чтобы хорошо плыть, хорошо ехать и т.д. Мантра «Лучше день потерять, а потом за 5 минут долететь»
Мантра «Лучше день потерять, а потом за 5 минут долететь».
Поскольку мы работаем с Git, начать нужно с настроек инструмента – без правильной настройки Git с 1С-проектами не заработает или будут проблемы при его использовании. Настраивать можно самостоятельно, опираясь на материалы из статей – есть много вариантов.
Но самый простой способ – это взять некий командный файл, который настроит Git автоматически.
![]()
В репозитории Vanessa Bootstrap в каталоге tools я подготовил два специальных командных файла по настройке Git – git-global-init.cmd и git-global-init-admin.cmd:


-
первую команду можно запускать в обычном режиме, она делает локальную настройку для пользователя.
-
а вторую команду нужно запускать в режиме администратора.
Командный файл git-global-init.cmd
![]()
Что происходит при запуске git-global-init.cmd?
Командами
мы указываем настройки имени и почты пользователя – это те настройки, под которыми мы будем вносить изменения в Git.
Команда
важна для корректного показа русских имен файлов.
Настройки переносов строк
нужны, если вы работаете на Windows – чтобы возврат каретки, перенос строки правильно учитывались. Например, команда у вас работает на Windows, а тесты, CI/CD выполняются на Linux. Чтобы нормально работало в гетерогенных средах, нужно выполнить эти две команды.
Также, если мы работаем через HTTP, желательно выставить максимальный размер буфера:
Подытожу — берем командный файл и запускаем, он нам автоматически устанавливает все перечисленные настройки Git, и еще несколько не указанных настроек.
Командный файл git-global-init-admin.cmd
![]()
В командный файл git-global-init-admin.cmd, который нужно запускать в режиме администратора, отдельно вынесено две команды.
Команда
нужна для поддержки длинных путей файлов, потому что у нас 1С любит длинные пути, когда выгружает исходники. Плюс некоторые тестовые файлы могут иметь длинные пути.
И интересная команда, которая устанавливает переменную окружения:
ее нужно установить, чтобы Git при выполнении верно показывал русские имена, русские сообщения в логах и т.п.
Командный файл git-global-init-admin.cmd нужно выполнить в режиме администратора.
Эту настройку нужно выполнить один раз – на каждой машине, где будет организована работа с Git.


